Developing extras for MODx Revolution. Part 3

This is a translation third part of the tutorial. As I wrote in previous article, to translate the second part makes no sense, because information on the creation of the feature page already. So I jumped over to third.
In this lesson you will learn how to package the Supplement in transport package, which can then be easily set via the "package Management". Packaging will all apply to developed by us, added: snippet; files from core/components/ and assets/components/; actions; menu, and namespace our CMP (feature page); the default values for the snippet with support for internationalization (i18n). And also add the resolver, which will create a user table in the database.
Reference:
For the packaging of simple additions, you can use PackMan. But in this case we want to do it yourself and fully understand what is a transport package.
setting the directory for the build
At the end of the lesson the _build directory will look like this:
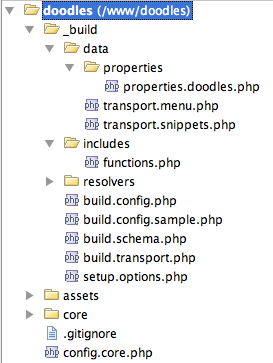
We are already familiar with the file build.config.php and build.schema.php from the first part of the lesson, but for now let's just look at the other parts:
data — Here we're going to put all of our scripts for packaging this package.
resolvers Folder contains a resolver for the transport of the package.
build.transport.php Is the main wrapper script which must be run to create the package.
setup.options.php — Settings of the installer. Later a brief look at what is needed.
creating the script wrapper
Create the file /www/doodles/_build/build.transport.php with soderjaniem:
the
<?php

$tstart = explode(' ', microtime());
$tstart = $tstart[1] + $tstart[0];
set_time_limit(0);

/* set package name */
define('PKG_NAME','Doodles');
define('PKG_NAME_LOWER','doodles');
define('PKG_VERSION','1.0');
define('PKG_RELEASE','rc1');

/* specify the path for the wrapper */
$root = dirname(dirname(__FILE__)).'/';
$sources = array(
'root' => $root,
'build' => $root . '_build/',
'data' => $root . '_build/data/',
'resolvers' = > $root . '_build/resolvers/',
'chunks' = > $root.'core/components/'.PKG_NAME_LOWER.'/chunks/',
'lexicon' = > $root . 'core/components/'.PKG_NAME_LOWER.'/lexicon/',
'docs' = > $root.'core/components/'.PKG_NAME_LOWER.'/docs/',
'elements' = > $root.'core/components/'.PKG_NAME_LOWER.'/elements/',
'source_assets' => $root.'assets/components/'.PKG_NAME_LOWER,
'source_core' = > $root.'core/components/'.PKG_NAME_LOWER,
);
unset($root);

/* override with your own defines here (see build.config.sample.php) */
require_once $sources['build'] . 'build.config.php';
require_once MODX_CORE_PATH . 'model/modx/modx.class.php';

$modx= new modX();
$modx- > initialize('mgr');
echo '<pre>'; /* used for nice formatting of log messages */
$modx- > setLogLevel(modX::LOG_LEVEL_INFO);
$modx->setLogTarget('ECHO');

$modx- > loadClass('transport.modPackageBuilder',",false, true);
$builder = new modPackageBuilder($modx);
$builder- > createPackage(PKG_NAME_LOWER,PKG_VERSION,PKG_RELEASE);
$builder->registerNamespace(PKG_NAME_LOWER,false,true,'{core_path}components/'.PKG_NAME_LOWER.'/');

/* zip up package */
$modx- > log(modX::LOG_LEVEL_INFO,'Packing up transport package zip...');
$builder->pack();

$tend= explode(" ", microtime());
$tend= $tend[1] + $tend[0];
$totalTime= sprintf("%2.4 f s",($tend - $tstart));
$modx- > log(modX::LOG_LEVEL_INFO,"\n<br />Built Package.<br />\nExecution time: {$totalTime}\n");
exit ();
There are quite a lot of things, but note that this is all you need for packing our namespace and file creation overpack "doodles-1.0-rc1.zip" (only). We examine in detail.
the
$tstart = explode(' ', microtime());
$tstart = $tstart[1] + $tstart[0];
set_time_limit(0);

/* set package name */
define('PKG_NAME','Doodles');
define('PKG_NAME_LOWER','doodles');
define('PKG_VERSION','1.0');
define('PKG_RELEASE','rc1');
First, we're going to get build start time to the end of withdraw how much time it took for Assembly. It is not necessary, just helpful information. Then we specify the name, version and type of release. Next:
the
/* specify the path for the wrapper */
$root = dirname(dirname(__FILE__)).'/';
$sources = array(
'root' => $root,
'build' => $root . '_build/',
'data' => $root . '_build/data/',
'resolvers' = > $root . '_build/resolvers/',
'chunks' = > $root.'core/components/'.PKG_NAME_LOWER.'/chunks/',

'docs' = > $root.'core/components/'.PKG_NAME_LOWER.'/docs/',
'elements' = > $root.'core/components/'.PKG_NAME_LOWER.'/elements/',
'source_assets' => $root.'assets/components/'.PKG_NAME_LOWER,
'source_core' = > $root.'core/components/'.PKG_NAME_LOWER,
);
unset($root);

/* override with your own defines here (see build.config.sample.php) */
require_once $sources['build'] . 'build.config.php';
require_once MODX_CORE_PATH . 'model/modx/modx.class.php';
Here we define the path where to find all the pieces of our bag.
Finally, we connected the file build.config.php and class MODx. Now it's time to load the object MODx:
the
$modx = new modX();
$modx- > initialize('mgr');
echo '<pre>'; /* used for nice formatting of log messages */
$modx- > setLogLevel(modX::LOG_LEVEL_INFO);
$modx->setLogTarget('ECHO');

$modx- > loadClass('transport.modPackageBuilder',",false, true);
$builder = new modPackageBuilder($modx);
$builder- > createPackage(PKG_NAME_LOWER,PKG_VERSION,PKG_RELEASE);
$builder->registerNamespace(PKG_NAME_LOWER,false,true,'{core_path}components/'.PKG_NAME_LOWER.'/');
Here we create the modX object and initialize the context of "mgr". Next, we ask for MODX to be more verbose in its messages about oshibkah during the operation of our script. Please print messages to the screen.
Then we load the class "modPackageBuilder" and get the two useful and registerNamespace method createPackage.
the
$modx- > createPackage(key,version,release)Here you can assign the name of our package (it must be lowercase and should not contain a dot or hyphen), version, and type of release. Now modPackageBuilder automatically will pack our namespace:
$builder->registerNamespace(namespace_name,autoincludes,packageNamespace,namespacePath)The first parameter is the name of the namespace ("doodles" in our case). The second is the array of classes related to our namespace (we do not need, therefore, set to false). The third parameter we want to pack the namespace in the package (set to true). And the third parameter specify the path to our namespace. This last parameter is key. Note the placeholder "{core_path}" will be replaced with the real path during the installation of the package, making the package more flexible. No need to specify the path hard.
And here's the last few lines of our packer:
the
/* zip up package */
$modx- > log(modX::LOG_LEVEL_INFO,'Packing up transport package zip...');
$builder->pack();

$tend= explode(" ", microtime());
$tend= $tend[1] + $tend[0];
$totalTime= sprintf("%2.4 f s",($tend - $tstart));
$modx- > log(modX::LOG_LEVEL_INFO,"\n<br />Built Package.<br />\nExecution time: {$totalTime}\n");
exit ();
Method pack() tells MODX that you want to create a ZIP file transportnogo package. The remaining lines simply output the time it took to build. That's all. If you run
it in the browser (I have http ://localhost/doodles/_build/build.transport.php), you will get debugging information in your core/packages/ is:
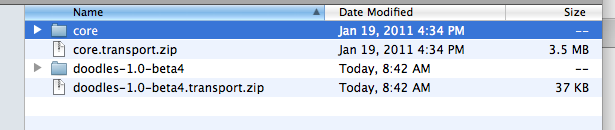
This is our transport package! However, specifically for our supplements that is not enough.
Adding data
We want to add our snippet to a separate category of "Doodles". In the file build.transport.php registerNamespace add below this code:
the
<?php
$category= $modx- > newObject('modCategory');
$category->set('id',1);
$category->set('category',PKG_NAME);

/* add the snippet */
//$modx- > log(modX::LOG_LEVEL_INFO,'Packaging in snippets...');
//$snippets = include $sources['data'].'transport.snippets.php';
//if (empty($snippets)) $modx- > log(modX::LOG_LEVEL_ERROR,'Could not package in snippets.');
//$category- > addMany($snippets);

/* create category vehicle */
$attr = array(
xPDOTransport::UNIQUE_KEY = > 'category',
xPDOTransport::PRESERVE_KEYS = > false,
xPDOTransport::UPDATE_OBJECT = > true,
xPDOTransport::RELATED_OBJECTS = > true,
xPDOTransport::RELATED_OBJECT_ATTRIBUTES => array (
'Snippets' => array(
xPDOTransport::PRESERVE_KEYS = > false,
xPDOTransport::UPDATE_OBJECT = > true,
xPDOTransport::UNIQUE_KEY = > 'name',
),
),
);
$vehicle = $builder- > createVehicle($category,$attr);
$builder->putVehicle($vehicle);
First we create a modCategory object (category) with the name "Doodles". Please note that we do not store any ->save () and only create the object. Next we have the code for packing the snippet, but yet ignore it we will go back to it later.
We then created a large array of attributes — attributes of the vehicle (Vehicle) category. What kind of vehicle? Well, it's a vehicle that carries an object to transport package. Every object (the snippet menu item, category etc.) must have a vehicle for "transport" in the transport package. Thus we have created one of them, but first appropriated a few attributes that tell MODX how the vehicle should behave when the user installs the package.
the
xPDOTransport::UNIQUE_KEY = > 'category' — here, we tell MODX that the unique key for this category is the category field.
xPDOTransport::PRESERVE_KEYS => false — sometimes we want the primary key of our object was "saved". It's not useful for auto-incrementing keys (PKs), such as the menu, which we'll get to later. Our category is not necessary, therefore, set to false.
xPDOTransport::UPDATE_OBJECT => true — this tells MODX that if the category already exists, we need to upgrade our version. If set to false, MODX will just skip the category if you find her. We want the category has been updated.
xPDOTransport::RELATED_OBJECTS => true — this specifies the related objects (specified the snippet). Our case is a good example. Any snippets that will be installed will be placed in a category.
xPDOTransport::RELATED_OBJECT_ATTRIBUTES Is an associative array with the attributes of related objects. In our case this is only a snippet, but it could be a plugin of TV-parameters (additional fields), chunks, etc.
Set properties object snippet:
the
'Snippets' => array(
xPDOTransport::PRESERVE_KEYS = > false,
xPDOTransport::UPDATE_OBJECT = > true,
xPDOTransport::UNIQUE_KEY = > 'name',
)
Here we say we save the primary key is not required (similar to category). Then we want to update an object if it already exists. And finally, we tell MODX that the "name" field is the primary key.
Next do this:
the
$vehicle = $builder- > createVehicle($category,$attr);
$builder->putVehicle($vehicle);
It packs our category object in a small vehicle with the attributes that we have just identified. This adds it to the shipping package. Ready! Our category is Packed. Now add to it the snippet.
Add snippet
Go ahead and create the folder /www/doodles/_build/data/. Now create a file /www/doodles/_build/data/transport.snippets.php. Insert this code:
the
<?php
function getSnippetContent($filename) {
$o = file_get_contents($filename);
$o = trim(str_replace(array('<?php','?>'),",$o));
return $o;
}
$snippets = array();

$snippets[1]= $modx- > newObject('modSnippet');
$snippets[1]->fromArray(array(
'id' => 1,
'name' = > 'Doodles',
'description' => 'Displays a list of Doodles.',
'snippet' => getSnippetContent($sources['elements'].'snippets/snippet.doodles.php'),
),",true,true);
$properties = include $sources['data'].'properties/properties.doodles.php';
$snippets[1]->setProperties($properties);
unset($properties);

return $snippets;
First, we created a small helper method that will grab our pieces of code from the file and remove from it the tags "<?php". Then we create an object of a snippet. Remember: no need to save, just create. It is time to return to the array $snippets. Remember salmantino of the file build.transport.php? This part:
the
/* add the snippet */
$modx- > log(modX::LOG_LEVEL_INFO,'Packaging in snippets...');
$snippets = include $sources['data'].'transport.snippets.php';
if (empty($snippets)) $modx- > log(modX::LOG_LEVEL_ERROR,'Could not package in snippets.');
$category- > addMany($snippets);
Remove the commenting. Now our snippet is loaded into the vehicle category. Now let's add the properties that we mentioned earlier.
Adding properties to the snippet
Create a file /www/doodles/_build/data/properties/properties.doodles.php like:
the
<?php
$properties = array(
array(
'name' = > 'tpl',
'desc' => 'prop_doodles.tpl_desc',
'type' => 'textfield',
'options' => ",
'value' => 'rowTpl',
'lexicon' = > 'doodles:properties',
),
array(
'name' => 'sort',
'desc' => 'prop_doodles.sort_desc',
'type' => 'textfield',
'options' => ",
'value' => 'name',
'lexicon' = > 'doodles:properties',
),
array(
'name' => 'dir',
'desc' => 'prop_doodles.dir_desc',
'type' => 'list',
'options' => array(
array('text' => 'prop_doodles.ascending','value' => 'ASC'),
array('text' => 'prop_doodles.descending','value' => 'DESC'),
),
'value' => 'DESC',
'lexicon' = > 'doodles:properties',
),
);
return $properties;
This is a PHP representation of the properties (parameters) of a snippet by default. Let's look at all of its keys:
the
name — the name of the snippet. This is the name specified in the call:
the
[[Doodles? &tpl=`rowTpl`]]desc — the description of the snippet.
type is the 'xtype' field properties. Currently available 4 type: "textfield" (text field), "textarea", "combo-boolean" (drop down list "Yes/No") and "list" (list of values).
value — the value of the property default.
lexicon — If desired, properties can be i18n-compatible. Just enter the name of the lexicon and MODX will do the rest.
So we have properties. But as you can see we have made reference to a new section of the lexicon "doodles:properties". Let's create a vocabulary file /www/doodles/core/components/doodles/lexicon/en/properties.inc.php like:
the
<?php
$_lang['prop_doodles.ascending'] = 'Ascending';
$_lang['prop_doodles.descending'] = 'Descending';
$_lang['prop_doodles.dir_desc'] = 'The direction to sort by.';
$_lang['prop_doodles.sort_desc'] = 'The field to sort by.';
$_lang['prop_doodles.tpl_desc'] = 'The chunk for displaying each row.';
As you can see here the contents like the section "default".
If you run the script now, our category, and the snippet with their properties will be Packed in cake. Great! But we missed the actual files our add. Let's fix that.
Adding file resolveref (Resolvers)
Let's add in the package file folder /www/doodles/core/components/doodles/ and /www/doodles/assets/components/doodles/ our add-ons. We'll add the files in our vehicle categories by using the so-called file resolveram.
So, in build.transport.php immediately after the addition of vehicle categories:
the
$vehicle = $builder- > createVehicle($category,$attr);add this:
the
$modx- > log(modX::LOG_LEVEL_INFO,'Adding file resolvers to category...');
$vehicle- > resolve('file',array(
'source' => $sources['source_assets'],
'target' => "return MODX_ASSETS_PATH . 'components/';",
));
$vehicle- > resolve('file',array(
'source' => $sources['source_core'],
'target' = > "return MODX_CORE_PATH . 'components/';",
));
Is to understand the two attributes:
source is the path where the files can be found. Use our source_assets and source_core, which was defined previously.
target is eval-string that returns the path where files will be placed in our Supplement.
The first parameter in the resolve() tells MODX that it is a file resolver. We will examine resolver later in this lesson.
If you run the packer now, it will pack the folder doodles/core/ and doodles/assets/.
Add a menu item, and action
Now let's add a menu item and action for the page component that we made earlier
Add the following code:
the
$modx- > log(modX::LOG_LEVEL_INFO,'Packaging in menu...');
$menu = include $sources['data'].'transport.menu.php';
if (empty($menu)) $modx- > log(modX::LOG_LEVEL_ERROR,'Could not package in menu.');
$vehicle= $builder- > createVehicle($menu,array (
xPDOTransport::PRESERVE_KEYS = > true,
xPDOTransport::UPDATE_OBJECT = > true,
xPDOTransport::UNIQUE_KEY = > 'text',
xPDOTransport::RELATED_OBJECTS = > true,
xPDOTransport::RELATED_OBJECT_ATTRIBUTES => array (
'Action' => array (
xPDOTransport::PRESERVE_KEYS = > false,
xPDOTransport::UPDATE_OBJECT = > true,
xPDOTransport::UNIQUE_KEY => array ('namespace','controller'),
),
),
));
$modx- > log(modX::LOG_LEVEL_INFO,'Adding in PHP resolvers...');
$builder->putVehicle($vehicle);
unset($vehicle,$menu);
Here everything is similar transportname medium (vehicle) category. Creates a menu object and the related object.
the
PRESERVE_KEYS set to true because the menu have a unique key and we want to keep the key of our menu item.
UNIQUE_KEY of the associated action object is an array. This tells MODX that you need to look for the modAction object, which has the namespace 'namespace' => 'doodles' and controller 'controllers/index'.
As you probably guessed, we need to add the file transport.menu.php. Create it in /www/doodles/_build/data/transport.menu.php:
the
<?php
$action= $modx- > newObject('modAction');
$action->fromArray(array(
'id' => 1,
'namespace' = > 'doodles',
'parent' => 0,
'controller' = > 'controllers/index',
'haslayout' => true,
'lang_topics' = > 'doodles:default',
'assets' => ",
),",true,true);

$menu= $modx- > newObject('modMenu');
$menu->fromArray(array(
'text' => 'doodles',
'parent' = > 'components',
'description' = > 'doodles.desc',
'icon' => 'images/icons/plugin.gif',
'menuindex' => 0,
'params' => ",
'handler' => ",
),",true,true);
$menu- > addOne($action);
unset($menus);

return $menu;
Everything is similar to transport.snippets.php, except that the method called addOne() menu object. Please note that all of the elements of the array fromArray() correspond to fields in the database tables.
So, the menu item and action Packed.
Adding resolver
When we install the extension in the system, we are faced with one problem — the DB table modx_doodles would not exist. Let's write a PHP resolver, which will start after transportnogo funds. Add this resolver to our vehicle menu. Immediately after $vehicle = $builder- > createVehicle($menu) add the following code:
the
$modx- > log(modX::LOG_LEVEL_INFO,'Adding in PHP resolvers...');
$vehicle- > resolve('php',array(
'source' => $sources['resolvers'] . 'resolve.tables.php',
));
Create the file /www/doodles/_build/resolvers/resolve.tables.php like:
the
<?php
if ($object- > xpdo) {
switch ($options[xPDOTransport::PACKAGE_ACTION]) {
case xPDOTransport::ACTION_INSTALL:
$modx =&$object- > xpdo;
$modelPath = $modx->getOption('doodles.core_path',null,$modx->getOption('core_path').'components/doodles/').'model/';
$modx- > addPackage('doodles',$modelPath);

$manager = $modx->getManager();

$manager->createObjectContainer('Doodle');

break;
case xPDOTransport::ACTION_UPGRADE:
break;
}
}
return true;
Great. I think everything is clear. We have the switch, through which can perform tasks depending on the current activity. Specify the path to our model and call the method addPackage(), which adds our xpdo schema (remember from the first lesson?). Finally, we are launching $modx->getManager() $manager->createObjectContainer('Doodle'). This method gives MODX run the SQL and create a table in the database for our class Doodle. Now you may remove the check for existence of DB tables as we did in the first part (the use of the resolver is not required, but is convenient). And in the end we will return true to MODX knew that everything went smoothly.
Now when installing the package will create a table of our additions to the database.
adding a file cangelog, readme, license and install options
Let's create the file readme.txt in your docs/ with soderjaniem:
the
--------------------
Extra: Doodles
--------------------
Version: 1.0

A simple demo for creating extra robust 3rd-Party Components in MODx Revolution.
Also create the file license.txt (contains a description of the license) and changelog.txt (the change log) if they aren't.
Now let's get back to the script build.transport.php and $builder->pack() add the following lines:
the
$modx- > log(modX::LOG_LEVEL_INFO,'Adding package attributes and setup options...');
$builder- > setPackageAttributes(array(
'license' = > file_get_contents($sources['docs'] . 'license.txt'),
'readme' = > file_get_contents($sources['docs'] . 'readme.txt'),
'changelog' = > file_get_contents($sources['docs'] . 'changelog.txt'),
'setup-options' => array(
'source' => $sources['build'].'setup.options.php',
),
));
As you can see, the method is called setPackageAttributes() that sets the attributes of our packer. Also, there is a new array 'setup-options'. This array has an element with the key 'source' — path to a PHP file (like a resolver).
Create the file /www/doodles/_build/setup.options.php with soderjaniem:
the
<?php
$output = ";
switch ($options[xPDOTransport::PACKAGE_ACTION]) {
case xPDOTransport::ACTION_INSTALL:
$output = '<h2>Doodles Installer</h2>
<p>Thanks for installing Doodles! Please review the setup options below before proceeding.</p><br />';
break;
case xPDOTransport::ACTION_UPGRADE:
case xPDOTransport::ACTION_UNINSTALL:
break;
}
return $output;
Looks familiar, huh? This piece of code allows us to display "setup Options" when the user will install the package. Now we just output the message to say "Thank you" for installing our add-ons.
Here you can add the form elements that will be displayed when you install the package and then processed by the installer. An example can be seen the component Quip: github.com/splittingred/Quip/blob/develop/_build/resolvers/setupoptions.resolver.php.
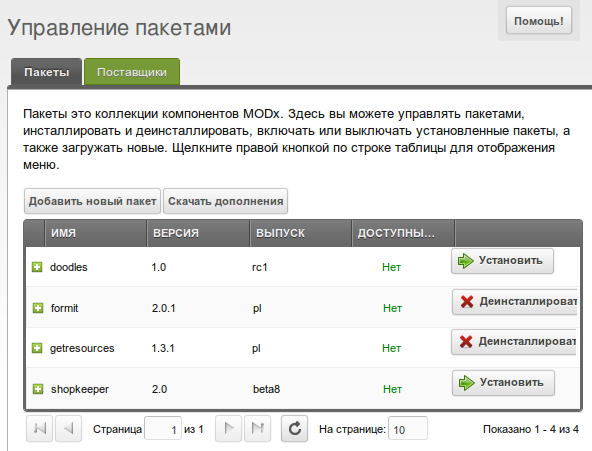
That's about it. Run packer (http ://localhost/doodles/_build/build.transport.php) and in the folder core/packages/ file appears overpack "doodles-1.0-rc1.zip". This file is available for download in the MODX repository add-ons and then it will be possible to install it via .
All the files that we created, the packer can be found here: github.com/splittingred/Doodles/tree/develop/_build.


Комментарии
Отправить комментарий