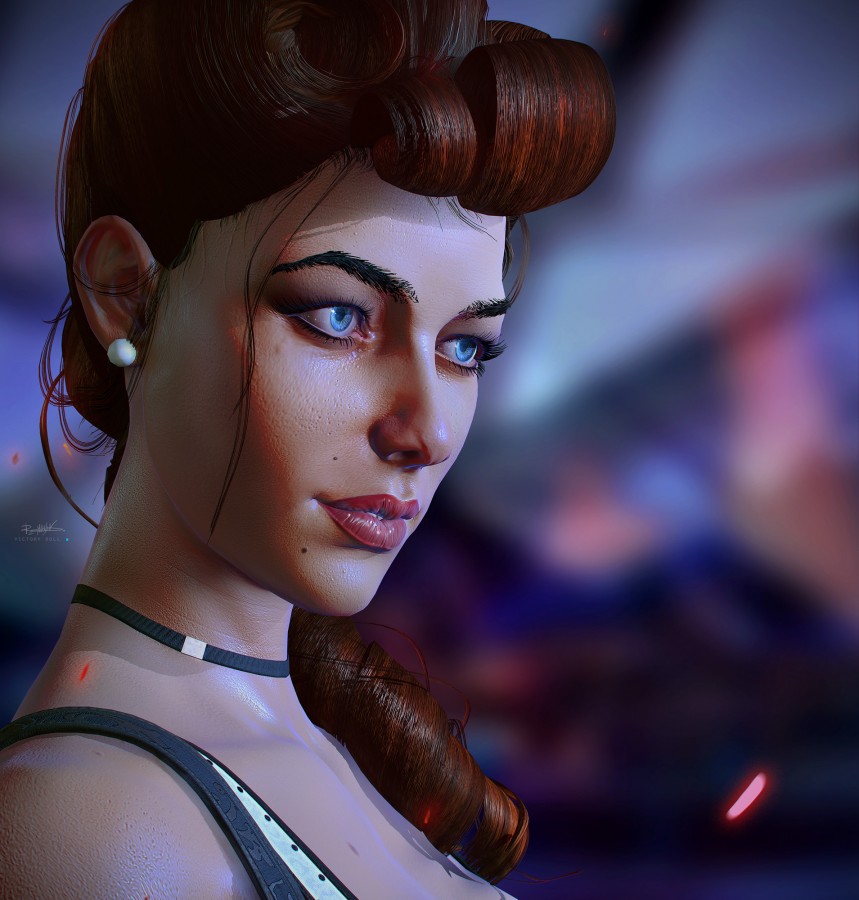
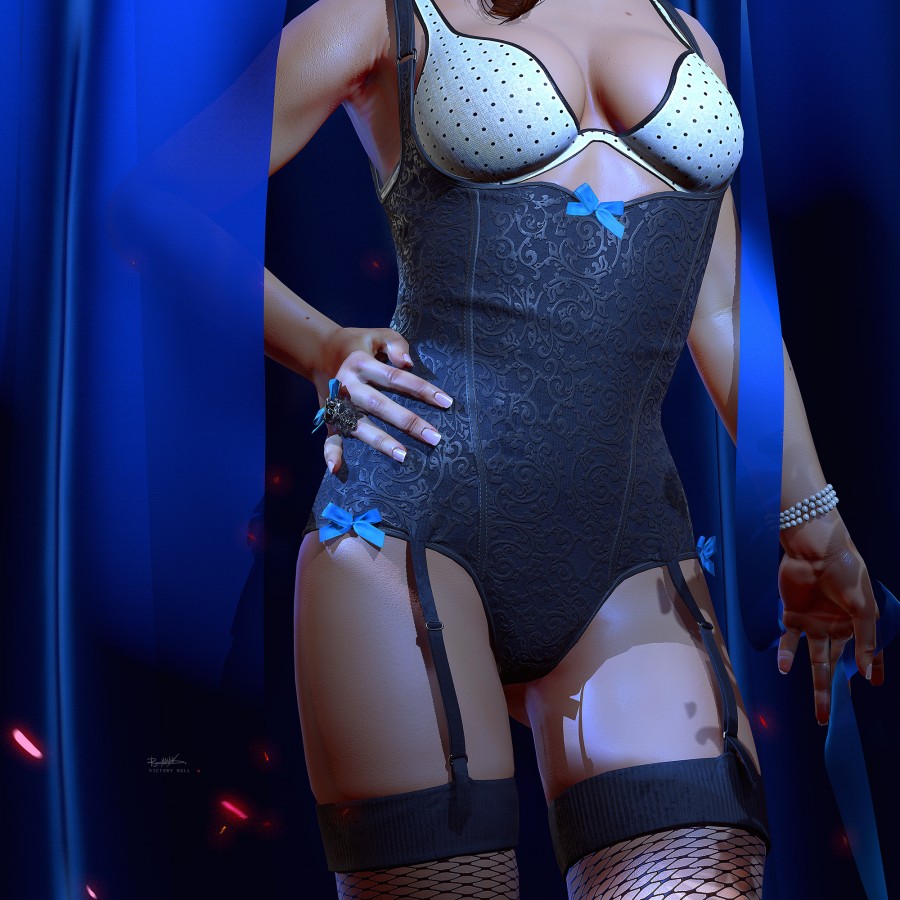
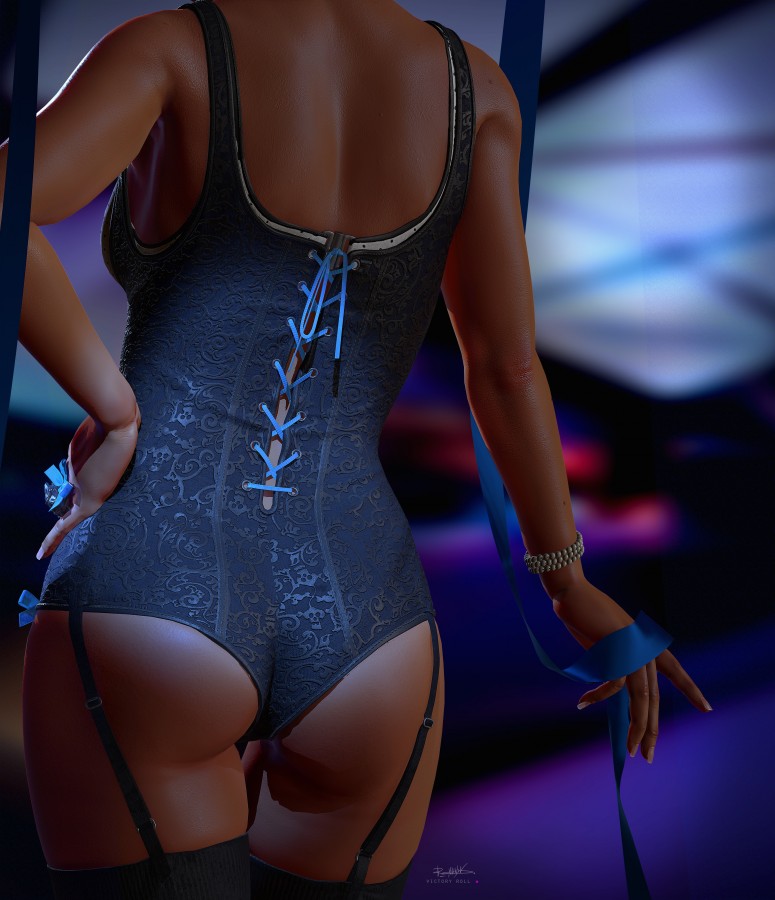
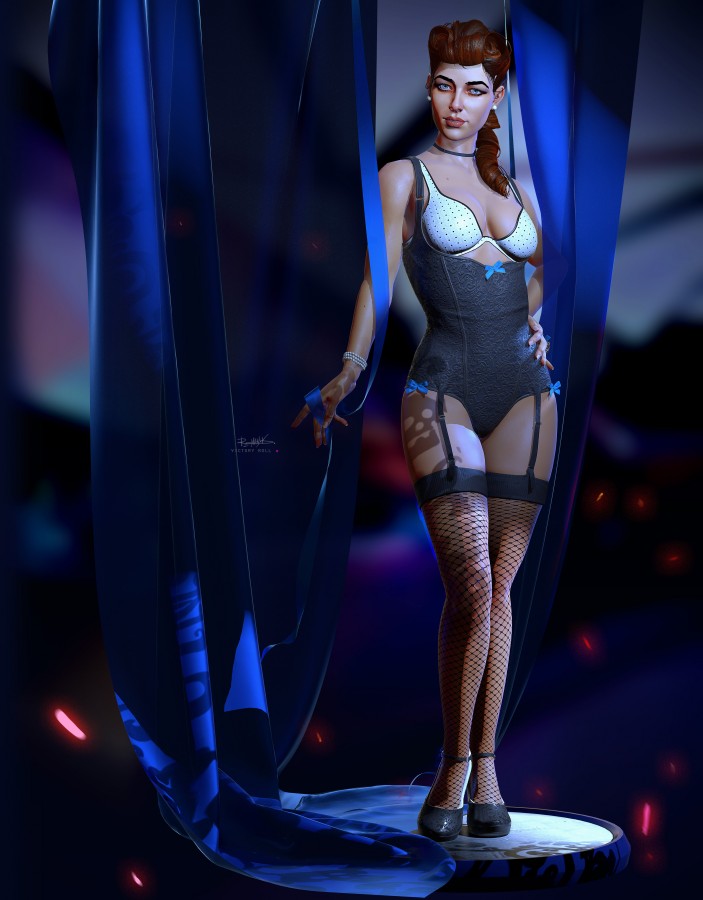
Girl's Victory Roll tutorial

. conf files
I needed to have a shared brush settings hot keys. conf files for programs, they are in my
Dropbox on a regular basis that I can do from any location to load and immediately start working. I consider it necessary
at least part of programs to shovel for themselves.
Build
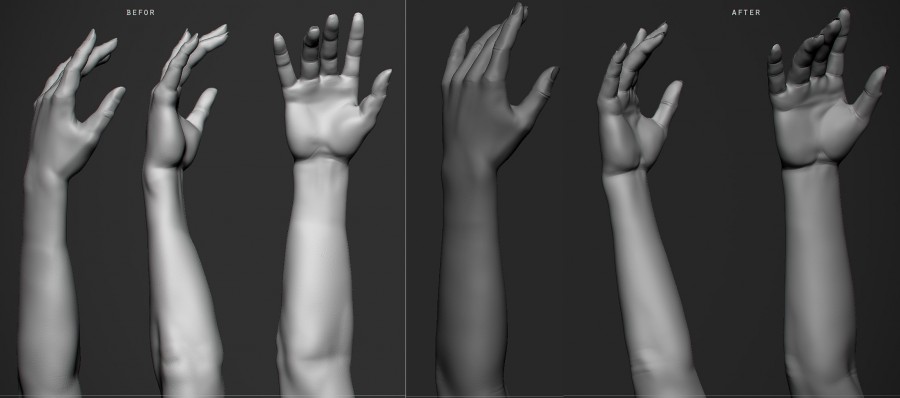
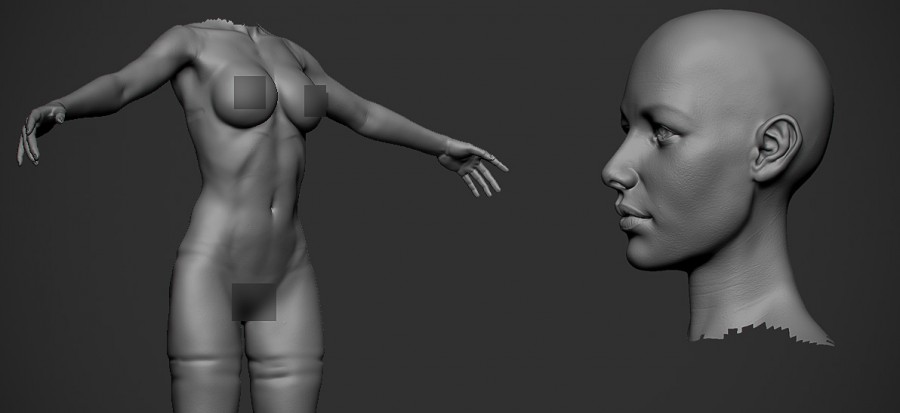
This time I did not spend the time to produce blanks of the body, and used the already finished with the previous model, freeing up time spent on revision of the anatomy and parts. If you overcome the inner perfectionist that constantly requires to start from zero, then the model can be done much faster using already prepared items. Of course they mean only their own blanks.
One of a set of changes
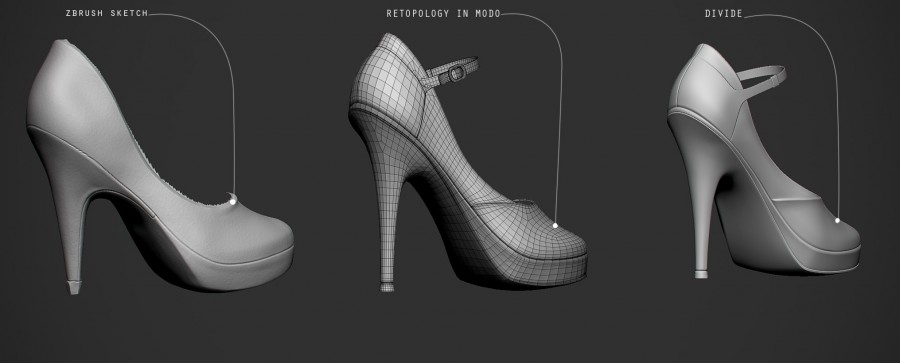
— Retopology shoes
For me, once again, the best method turned out to be “retopology under subdiv sketch from zbrush”. The Shoe has a very smooth
form and, in my opinion, much faster and better to make it under subdiv, instead of boring and licking the model in zbrush in order to get perfect surfaces. In addition will notice after retopology, the resulting output grid gives you more control over the model than the four subdiv in zbrush. The sequence of actions are almost always the same: decimal object, export the simplified hipoly and retopology in modo.


used me tools to retopologize in modo
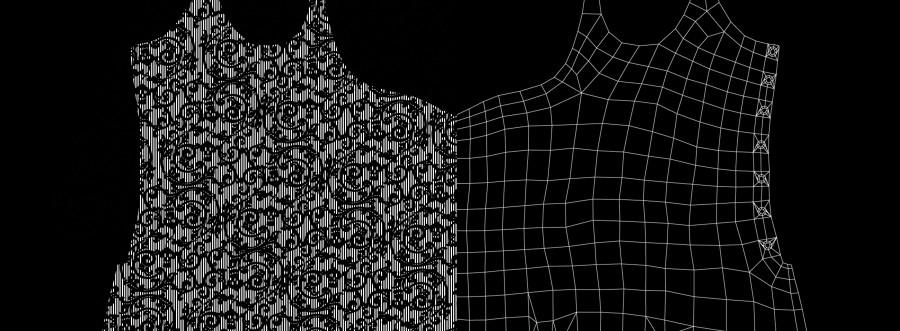
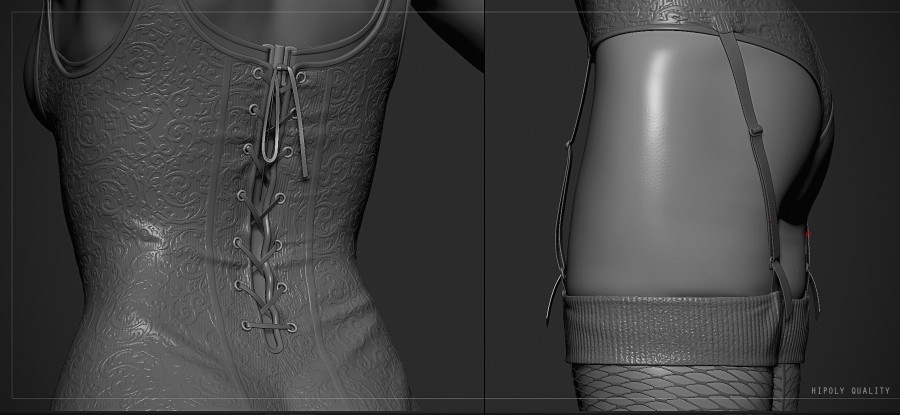
— Retopology corset
Retopology corset is made in a similar manner, but causes retopology model from Zbrush are very different. This is due to the pattern and the pattern that is on the corset.

After retopology resulting grid allows you to accurately produce the scan for future manipulation. Remains only razmestit Photoshop pattern file that you saved uv.EPS from modo. To do this, select the object, go to the Texture tab and выбратьExsport UVs to EPS and save.
an Example of a pattern.
In addition, the corset I needed another pattern, vertical lines, between the voids of the pattern. For them I made the mask, which was obtained by inversion of the previously made pattern and overlay it on a striped pattern, using a layer mask in Ps.Received two masks projected on the corset in zbrush, using tool Mask by Alpha in the Masking tab. Then it only remained to apply the tool Inflate in the Deformation tab.
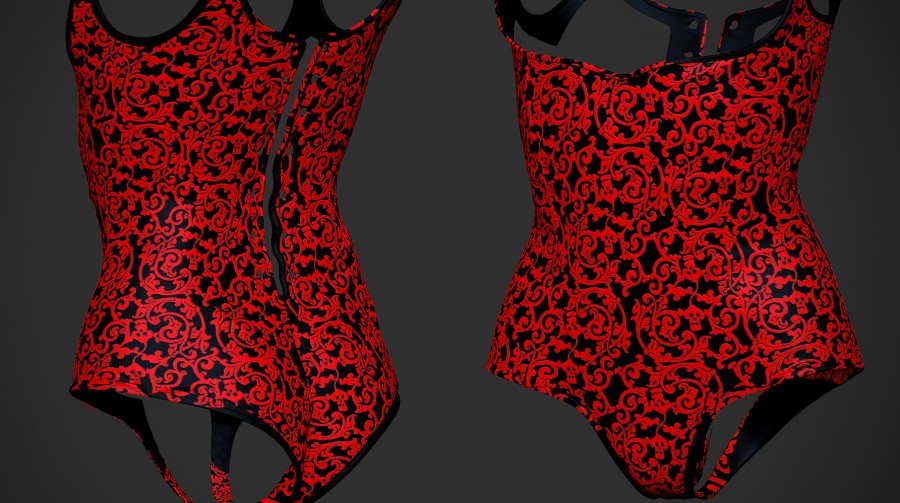
the result of applying the pattern by UV scan.
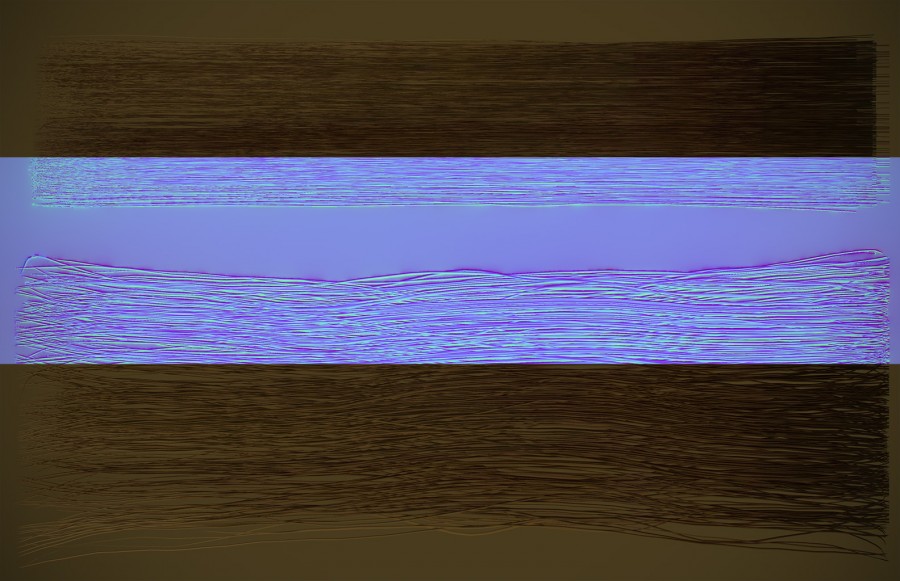
Hair
In order to not get buried in the curls and shaping the hair, I made a sketch in zbrush, and then in modo tightened and customized curls under the outline of hairstyle on the right.


My basic brushes in Zbrush.
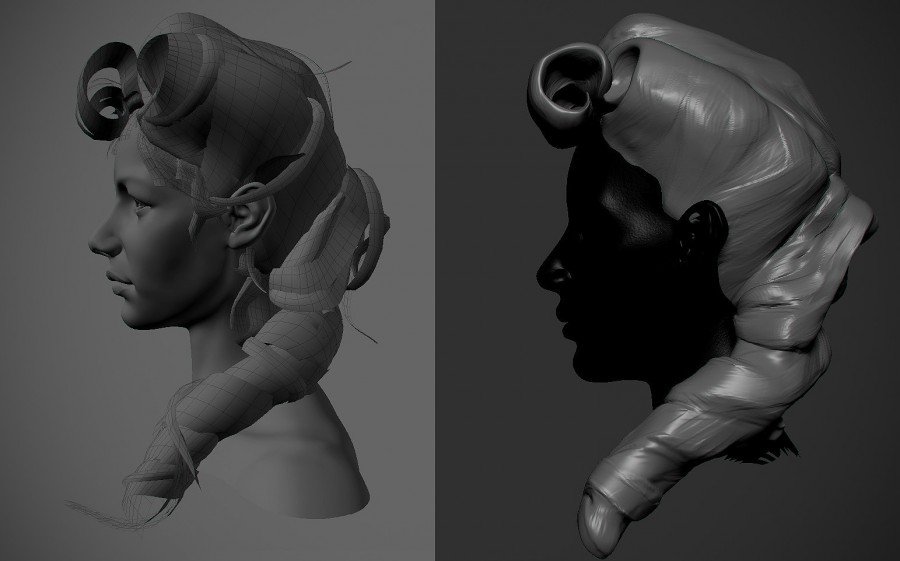
Strands of hair I divided into four parts, two of them very tight, but distinguished by a long, the third part of the hair to wasnegative, and the fourth is a few hairs sticking out or hanging separately.
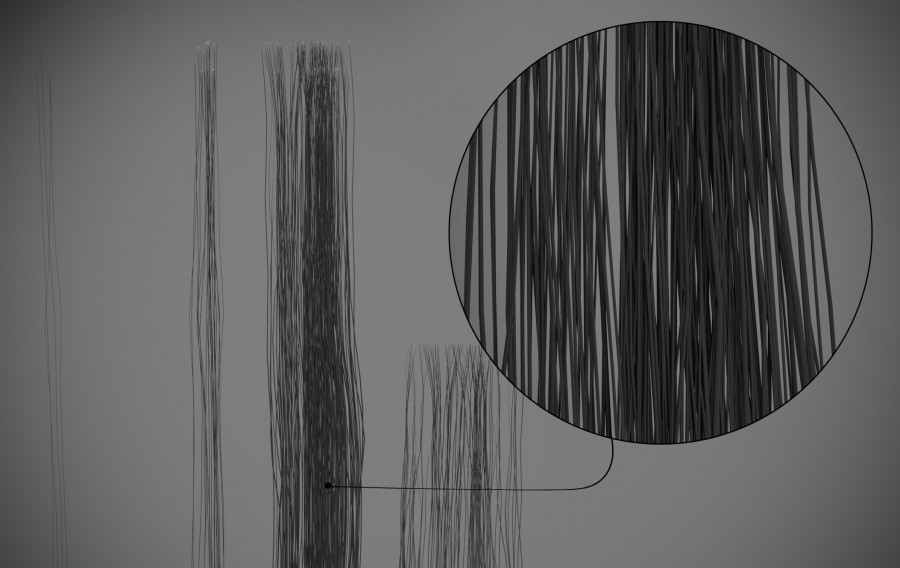
In modo made one strand of hair, then ascopiave it into thick rectangles, then in Zbrush gave no uniformity. Why I didn't do it in modo? Due to the lack of accurate analog hands Move and Move elastic transfer. I only had to bake (again, all the baking I did in Baldur's gate disigner) all groups of hair, on a flat die geometry, prepared by analogy with the previous model “Pinup”.

Dies for baking c an alpha channel, tools modo
The next step was to twist them tools Bend, Twist, Swirl, Sculpt Move.

hair Texture obtained above described method.
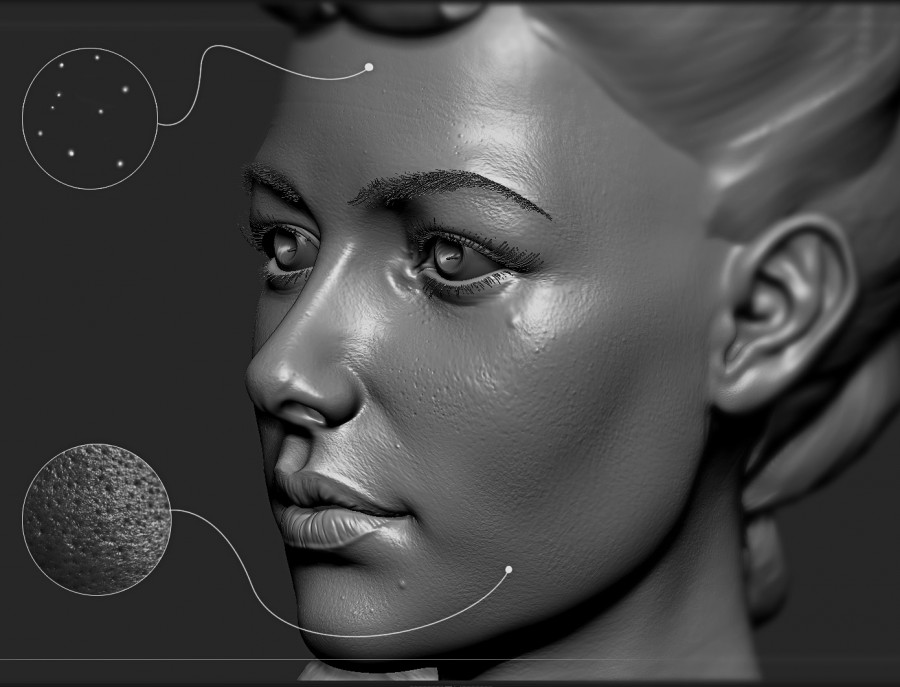
— Chipole
To simulate the skin and facial detail on hipoly, I used a pre-prepared library of brushes for Zbrush. When
applying a pattern on chipola model, reduce the risk of getting stitches on the lowpoly and it also eliminates a lot of manual
work during texturing.
One more note: the quality of the parts obtained baked hipoly model does not compare to the quality of the parts imposed during texturing, in the case where heires model did not have them. I obviously invested time in hipoly frees up your time when texturing. An exception are models that have a tiled texture or surface. In this case, to achieve the quality of normal maps is much easier while texturing.
The description above add. The reason is the risk of seams on the texture is that if a pattern is added to texture to normal map, any minor twists scanner, such as feet or hands will affect the appearance of seams, which are hard to get rid of, for the reason that pattern does not take into account the orientation of the sweep, it just falls on top of repetition.
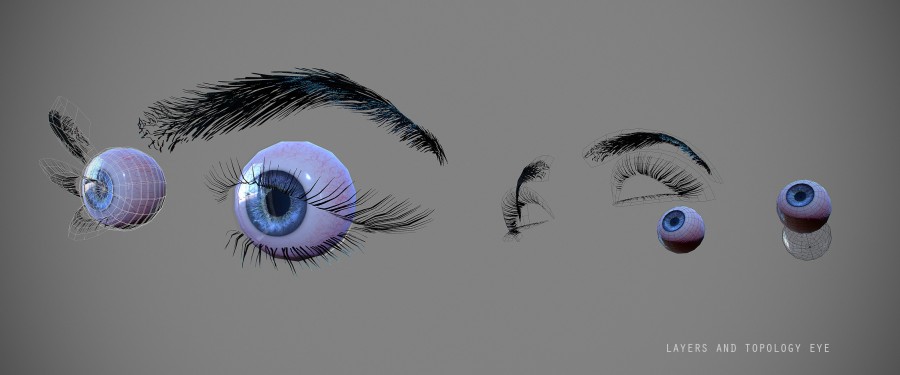
— Lashes and eyebrows
As eyebrows and eyelashes it is the small details that simply blur the texture, if they draw or overlay on the texture together with the whole body, so I chose the method of separate texture. This allows you to display a very recomeco texture without loss of quality. The texture of the eyebrows and eyes, I posted to the same resolution of 2048 was enough for the entire group. In consequence of this group I have moved to a custom element for future models.
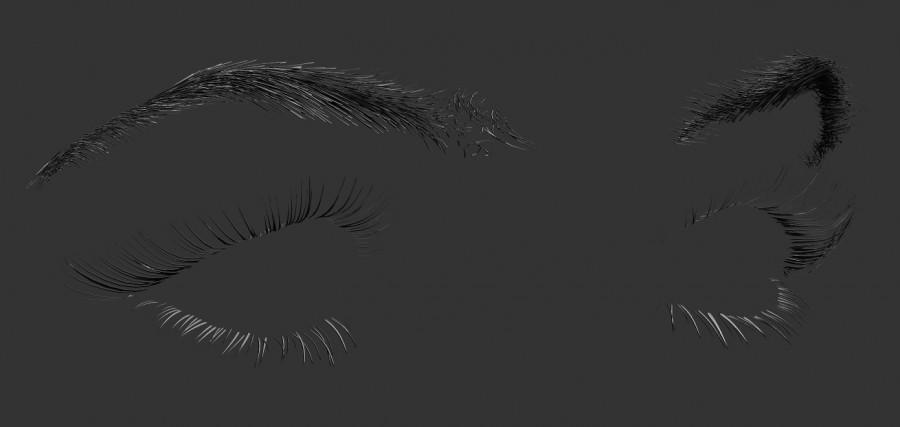
Eyelashes I hotmodels and set up in Modo, for me it was faster, eyebrows performed by the tool FiberMesh.The eye has two layers of geometry, the second layer's geometry plays the role of glare film. The only disadvantage is the fact that eyelashes ibreve not drawn on the shared texture, and have a single geometry that during skinning they will have to hang on bones and spend time fixing jambs after the face morph.
Eyelashes I hotmodels and set up in Modo, for me it was faster, eyebrows performed by the tool FiberMesh
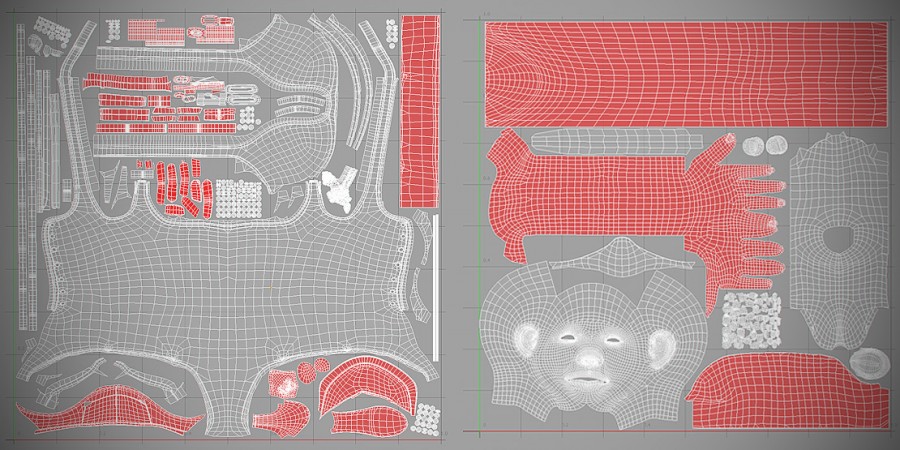
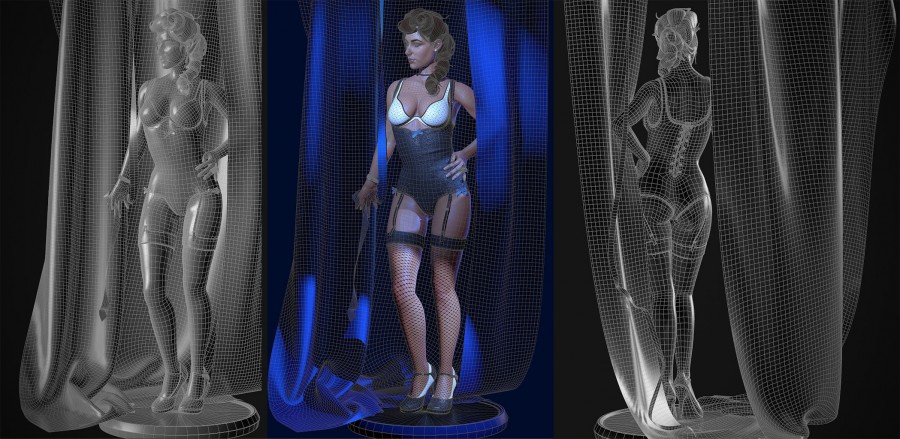
Lowpoly
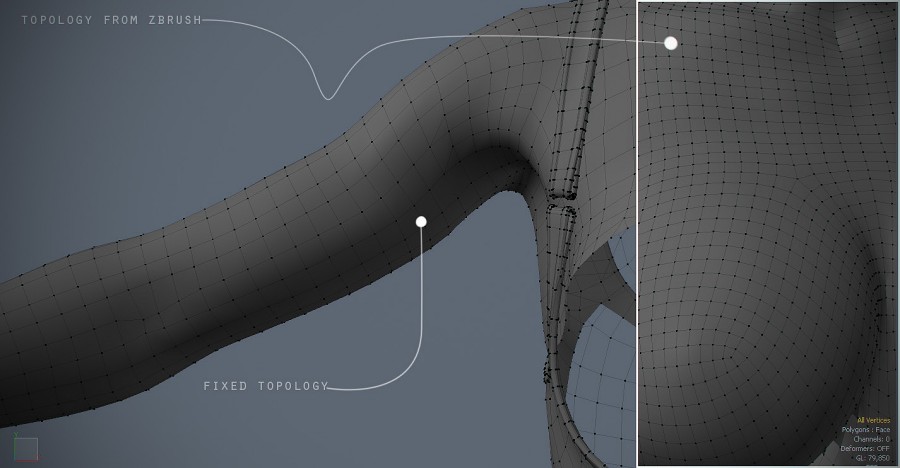
Once again I used retopology in zbrush, it is possible to reduce the time, but I believe that this saved time I spent on editing the topology after zbrush. Tool in Zbrush zremesh issues are not always perfect, lowpoly, you have to edit, even after vertexpaint, which depending on color painted generates a larger or smaller number of polygons. Almost always turns out that somewhere a clever tool creates the illusion of time saved, while then, the time spent on fixes and improvements.
Topology

— Smus group
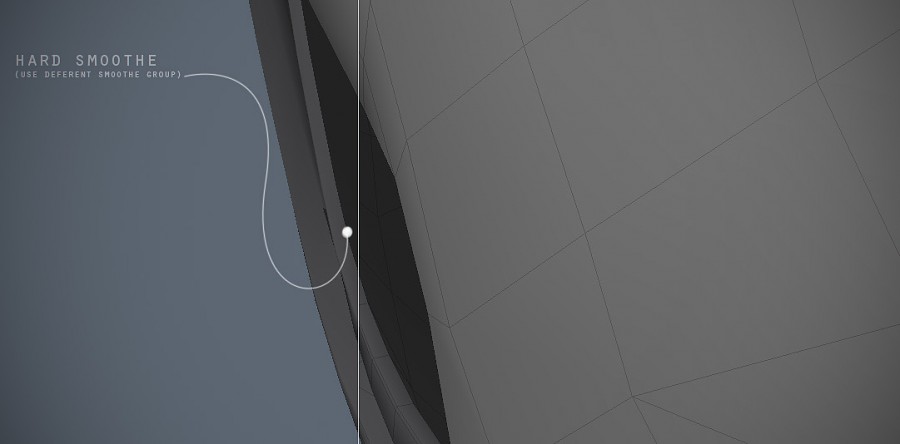
On this model, I almost never used the smus group, except that in the inner parts of the corset. I assign a smooth group to avoid any minor unpleasant glare shading. Basically cut loupe in places where I needed a clearly readable face, or in places where the shading of the face on the contrary was required to mitigate. Adding loops gives bol a smooth transition of the angle and does not share the scan, creating extra opportunity for the appearance of the seams on the texture. (For appointment to a conspicuous place in two different smus groups need to avoid the seam on the future structure, for that at this point the scan is split into the fractions of a millimeter). In the code example below shows, a sharp edge from the use of two different smooth groups, in this place, you should always put the seam on the scan or scan to separate.
The purpose of sasgroup in modo is through GeometryPolygonSet smoothing group. Suggest that certain functions assign Goryachiy key.

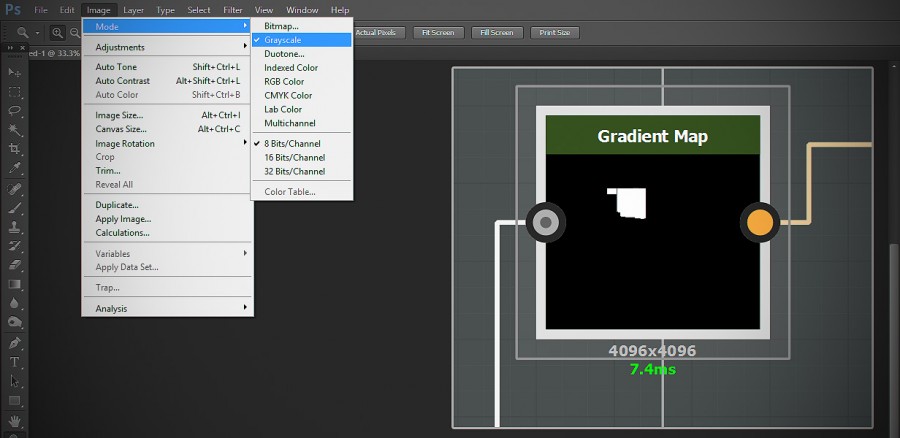
— Scan
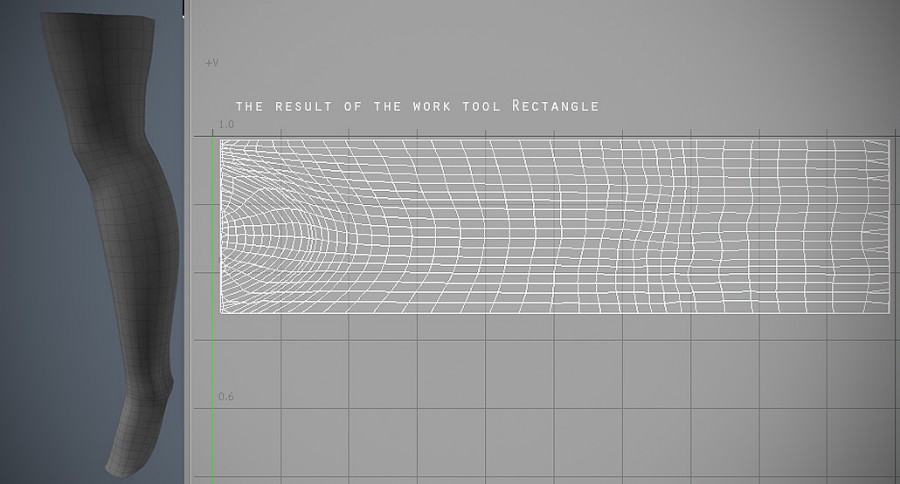
With the new version of modo 901 has a Rectangle tool that enables easy scanning in places that have a distinct pattern of polygons. They will lapatsa instantly, bringing all the work to two clicks. select object > Rectangle tool and click in an empty space in the UV window. For me it's still magic, to work this tool, you can watch again and again.
The model has four uv map 4096x4096 to fill the maximum space of a square, I often distort the scan, giving it the shape of a square or rectifying a few parties. After this operation, the probability to catch at this point the seam is extremely high, but because of the high quality textures this will not be noticeable.
— Deviation in accumulation of tools
I want to speak about the accumulation of personal content and toldova, in my opinion now in the industry is the stage of accumulation of the plugins scripts personal bases with models that are expressed as collections of repetitive daily processes. This is perfectly illustrated by the example plug-Ndo, in which routine work is kept in the pre-configured profiles. Under the accumulation of content, I mean quality and diversified models, textures and any materials that can be reused in different projects. In my opinion, due to the fact that most of the participants in the cg industry, have mastered the many tools and techniques for working with the programs. Perhaps the next generation of artists will use these large databases as easily and shamelessly, as is happening now with photos on the Internet, which is already routinely used for quickly finding the images and detail of the concepts. And it's pretty cool, so in conjunction allows you to move on to new levels of quality, thus condensing the time spent on work using with the use of time previously spent by other people. It's possible that while we are developing new approaches and simplify the process, someone watching this and develops on the basis of them, your product which automatiseret and replaces a large part medalernogo functionality. And it should be ready.
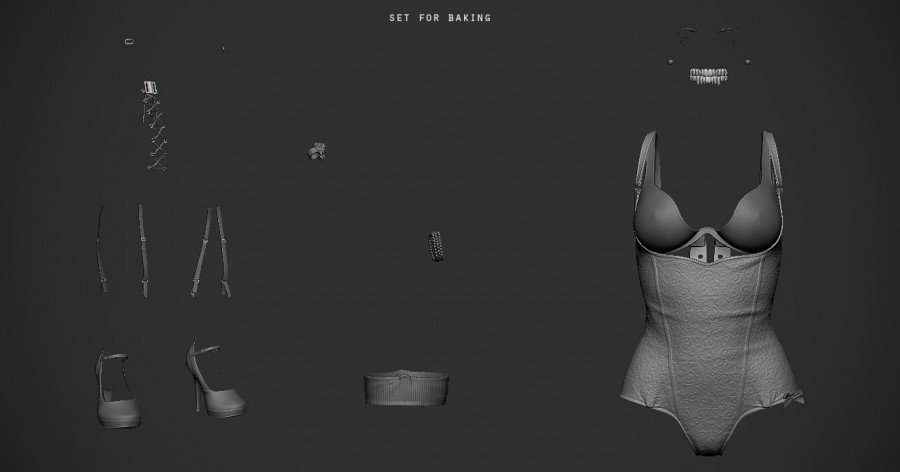
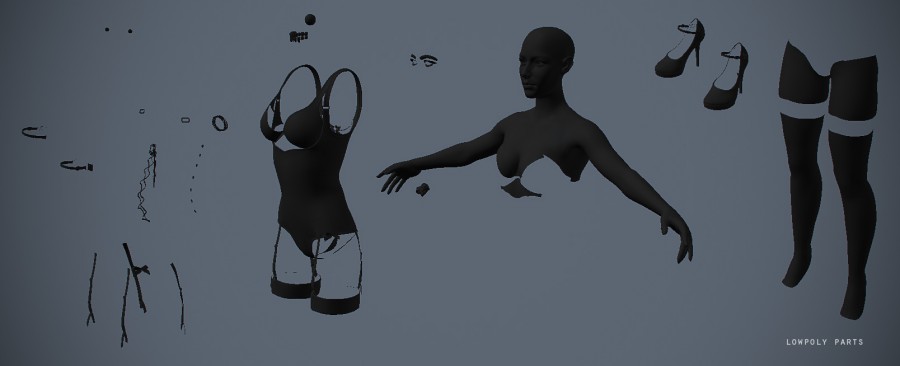
— Preparation hipoly for baking
My hipoly model is broken in many pieces, in this case, I divided the model due to the collision of certain objects and because of the volume of the model. For example, the body has several pieces, as the head carries much more details than the body, and therefore Divide the number on it is required many times more. Entirely the same model, I just cannot save because of file size. Immediately warn those who are thinking about Decimetion, it rolls only in the case when there is no obvious small details like the pattern of the skin, otherwise it just will not give all these little things will ruin a significant amount of work done. I separately cut off from the body of the head, nails and clothes. Bake the entire model in substans disigner.
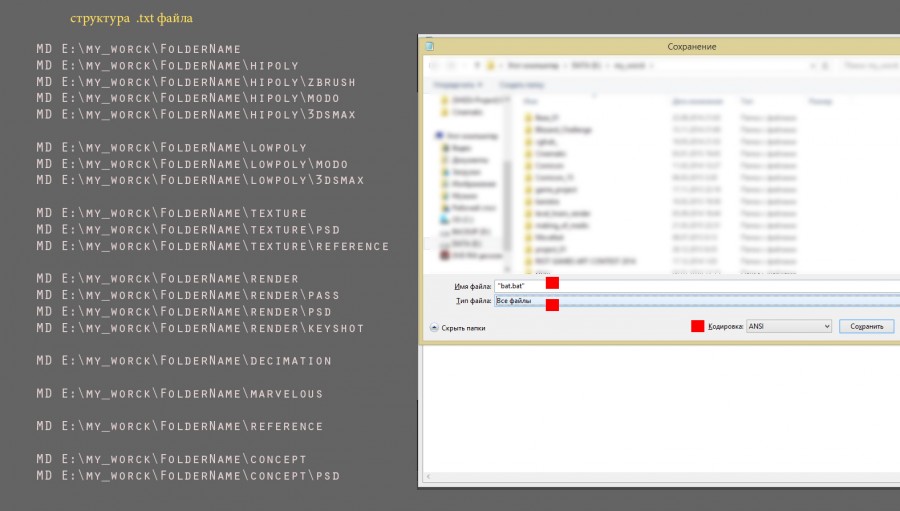
the folder Structure
For the same type of structure projects I use .bat file, which brings me one and the same project structure. To do this, in Notepad, you need to print the MD command with a space after it, the address and the name future folders (MD E:\my_worck\FolderName). The next line is a copy of the first, and enumerate each folder, which is inside the first. Example of my folder structure on the left.Then save the text document format .bat, to do this when you save select file type “all files” and file name is entered the format .bat and enclose everything in quotation marks “myname.bat”. The example to the right.
-Split the lowpoly
The lowpoly as well broken into parts for convenience and to avoid unnecessary work in photoshop, otherwise peresekaemost will give a lot of stocks to normal ' and have to cover up in photoshop.
— Decimate hipoly for ID mask
In this case Decimetion in Zbrush I used to train under baking hipoly id mask id is taken from polypaint, in these cases, details on HiRISE not important, more important for me to pass the boundaries of all parts hipoly and get some basic gradients and colors from polypaint. Often before polypaint I do, decimate hayreza, due to the volume hipoly, and then throws the result obtained several Divide for sharpness polypaint texture. As its sharpness depends on the number of Divide, which hangs on the model.To add a pattern to a color id mask I repeated the procedure with a mask, manufactured according to the scan earlier and premarinultramed Inflate, filled this area with color FillObject, pre-Inverto mask.

Polypaint in zbrush for id mask.
— id mask
My color id mask contains colors that match the colors of preconfigured materials in Substance disigner. So far, I have not so much: metal, leather, fabric and plastic. Accordingly, I do polypaint hipoly in the right colors and after baking, the texture will be every time re-grouped taking into account the color of the id mask, and performing the same repetitive manipulation instead of me.
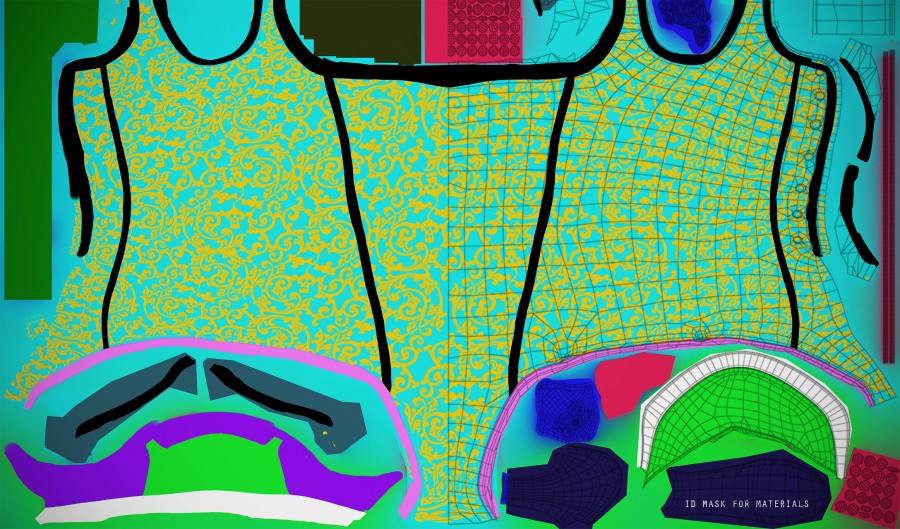
id mask.
— Baking symmetric model
When baked, one of the recurring elements or symmetry, you should not forget to scan to make a duplicate of the sweep beyond the boundaries of the UV square. And keep all duplicate and symmetric geometry elements palopoli merged into a single model and a single shading. As such, the shading will not spoil the edge of normal maps and there will be a sharp seam. Wmoen the case of symmetric elements: the arms and legs.
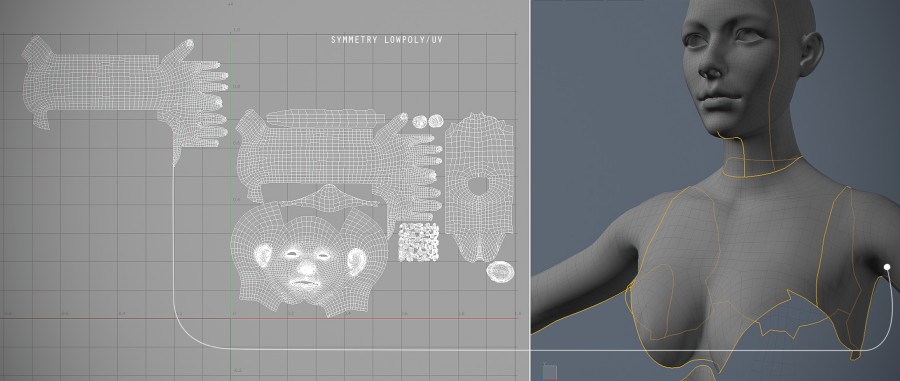
I should add that the same situation with the smooth groups on the lowpoly, designated with two different smooth groups must be separated on the uv map. Otherwise the normal map will appear with stitch.
Stockings
The stockings were dried separately from the body. In my opinion if you bake everything together, we can achieve the feeling that the stockings merged with feet. This is because on the verge of a normal map stockings and legs, a hard clipping of one color from another, and there is a smooth gradation of color normal map. You have to understand that for the main part of industry is quite acceptable, it is not uncommon to save time on such things simply do not pay attention.

Based in Paterna stockings were one cell, which I drew in Photoshop. After use of this pattern in the tab edit asmoh to repeat the item any number of times.

The next step needed scan of leg, received with the lower sabula hipoly. But before that, I cut off the leg and copied it to a new file, as manipulation of the body ate a lot of resources. The resulting scan I exported from modo to .EPS and already in photoshop to mimic the tensile grips of the tool transform. The mask was imported in Zbrush and after several Division displayed it on hipoly through a mask tool mask from alpha. Created by the mask allows you to separate the geometry tool extract tab subtul. The new layer removed the internal plane that is displayed in a different poligraphy, it's too much geometry. Then used Zremesher to get a more adaptive geometry.
Calculation
Allow yourself more time to retreat, and to specify the time baking and other calculations that often takes a lot of time. Pre-arrange with your employer about remote working use of the computer in the evenings is idle. While you could use it for baking compute and render, configuring remote access. Many employers and companies will not give you this, if you correctly describe the request. In small companies this agree is not difficult. Ideally, for these purposes it is better to have a backup computer at home in the pantry. Such a maneuver me personally cuts the time in half.
— Collection of schemas in Substance disigner
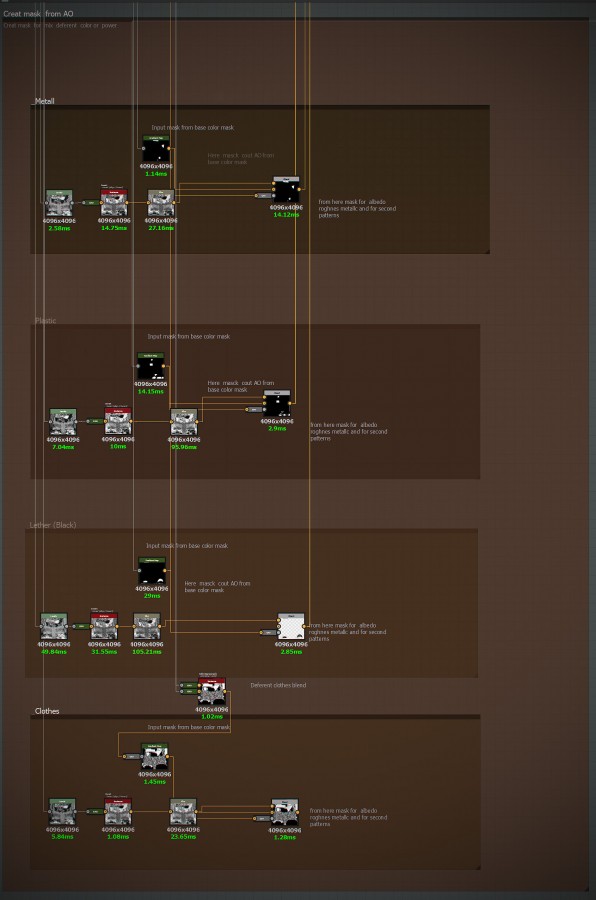
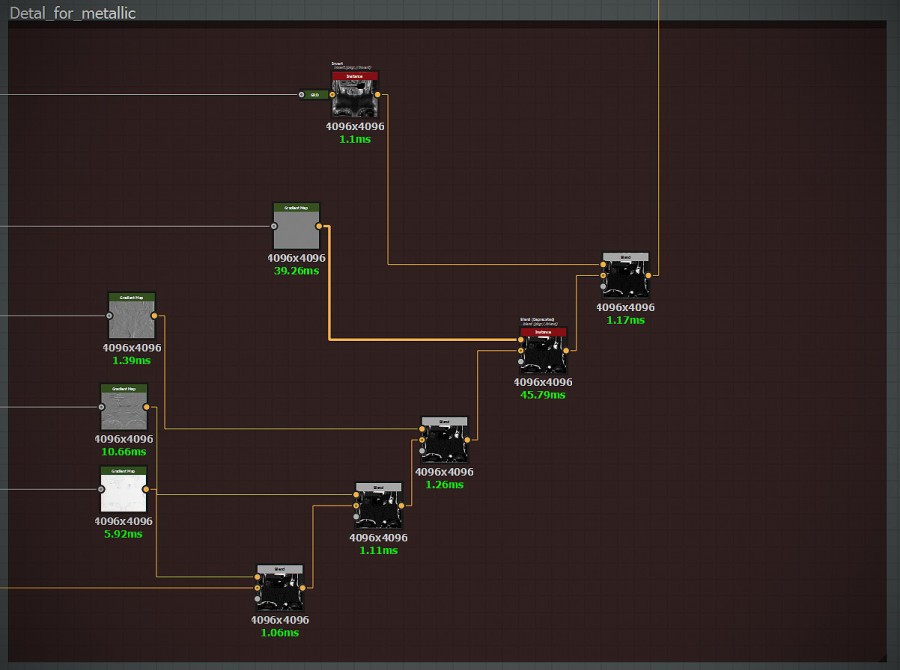
For automatic Assembly of similar textures I collected in Substance designer scheme, the essence of which consists in the generation of the id mask pre-made textures. We are talking about textures alibedo, roghnes, metallic, and normal map. I took my tried and tested process in photoshop, as the result, I perform the same manipulations for almost all textures. And actually I decided to bring in the form of block diagrams in Substance. Interest in this scheme is that having the normal map, oksygen and ID mask with a certain color, for which I pre-defined the materials, you can quickly gather the same type of texture but with different colors and patterns.
I all starts with a basic block that parses the Id mask in the tree, each branch of which corresponds to its color and
material with Paterno, which you can always change at any.
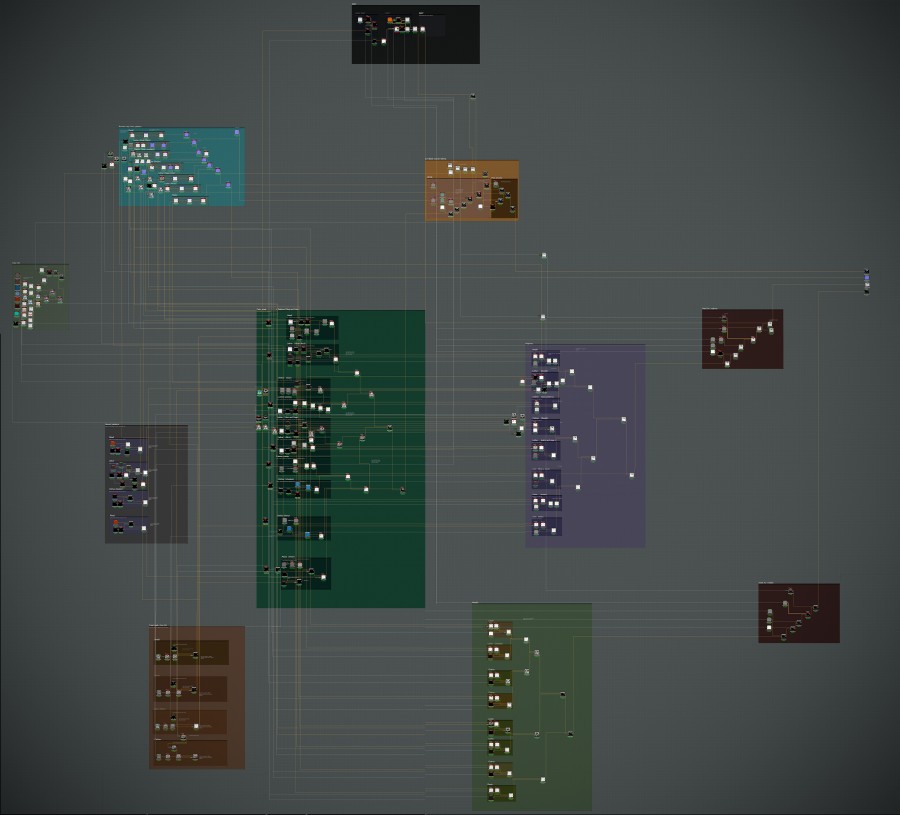
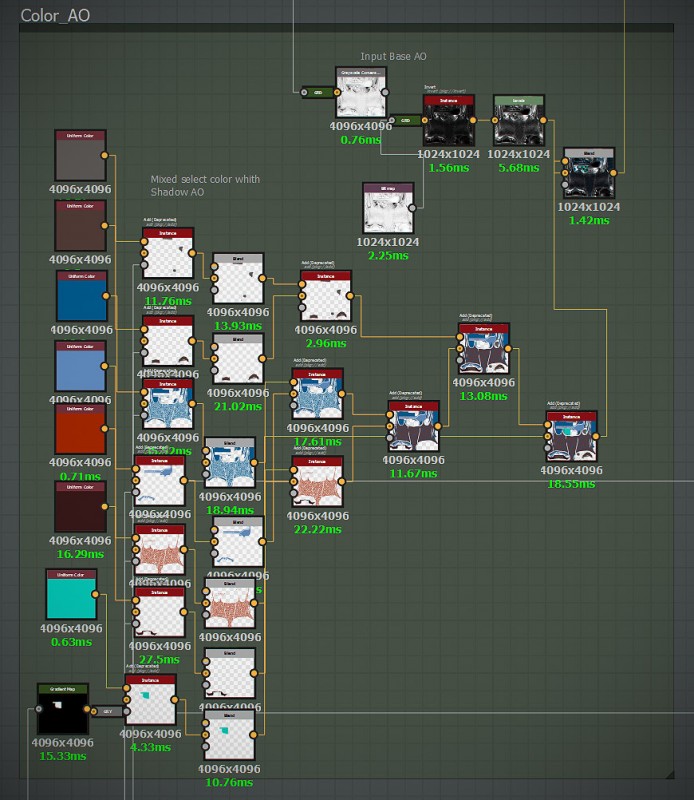
it looks like the whole scheme is in Substance disigne.
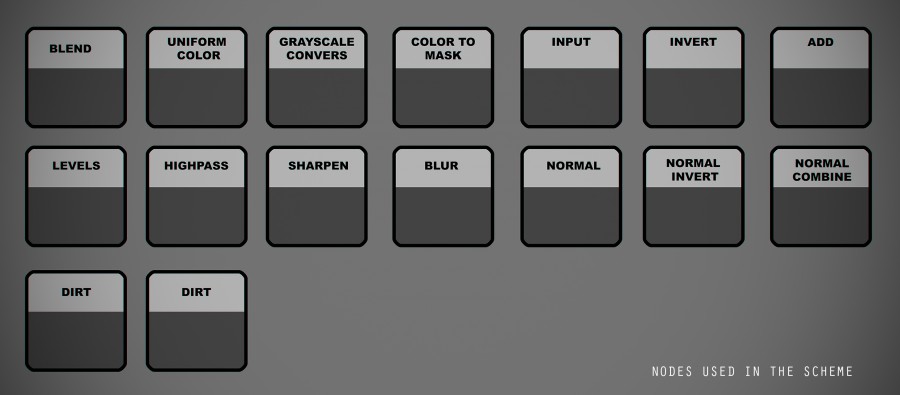
— a List of all used node
— Branching schema
Almost every unit has the same form, branch pattern and the branch with color. Additionally each unit has a separation of color in an additional two degrees. These degrees can mix simulating attrition, they manifest themselves in the form of a punch of one color through another, depending on the mask. The mask I take from oklina, pre-raising the level of this part that would betray the mask of field.
— Processing onluine
This texture is rendered in a separate unit, which via the id mask of okrugin cut and prepared for use as masks in the next block, which in turn mixes two colors. And so it is for each branch of the material from the main unit (base color in my scheme is file id mask)
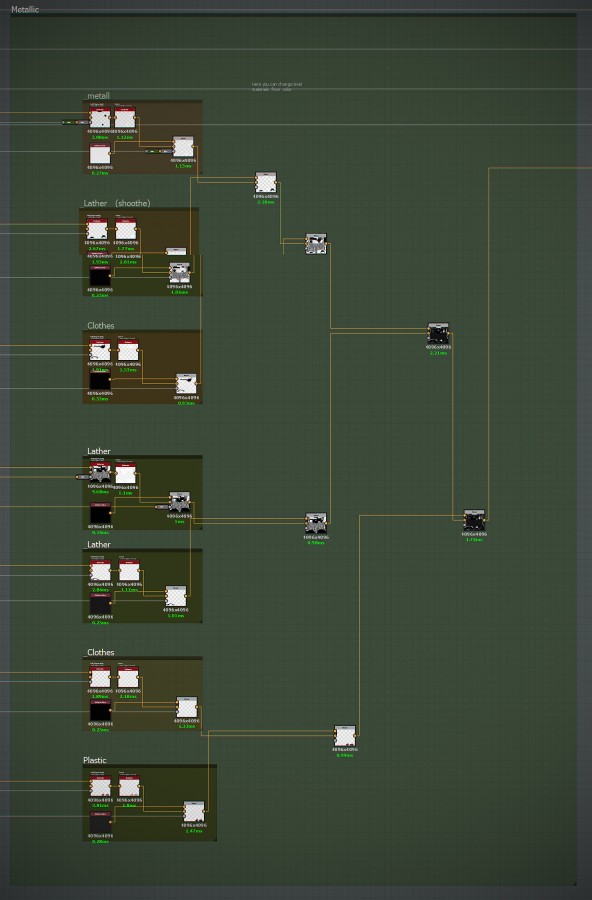
Block Rognes and metalika
Structurally similar, the task of both blocks to take a pattern from each branch of the main unit, to cut it in alpha, obtained from id mask, and paint in desired shade of gray with the raising of level or if you want to invert the pattern. Then all the branches are being consolidated into one node, which goes to the next block. The mask obtained after merging branches, mimics the worn surface, cutting off and muting pattern.

Blocks overlay detail
Each unit after major manipulation needs to obtain final details and sharpness. All items in turn, I removed from the channels of normal map. In fact, it can be seen from the screenshots schemes, where two channels red and green are multiplied to all the preceding nodes.

— Block. map
In this place of all my patterns generated normal map and overlayed on the base texture to normal, whatever he needed me there or not, but by default, I reduced the possibility of obtaining the normal of each branch of material. In any case, you can lower the intensity of the normal maps to zero in the right branch. For branches normal map also work wear, as in a shabby place money had a life of intense normal.
When I worked with the unit, which should generate a pattern of normal map and overlay them on the main texture, totalcols with the problem. When I cut the patterns using the masks, the pieces of the generated patterns were reduced into a single node, after chagunarayan it to the main normal map. This mix gave distortion tones normal maps and increased its contrast. Why is this happening, I did not understand but the solution I found when sliced individual pieces of patterns put in order in a ladder sequence, then all was OK.

— checkpoint processing
This is my final block, which carries the imposition of all parts by caviti and post processing, with a small proportion of okrugina, nabrany layer from the main unit. The first stage in the block is parsed for normal channels, which in turn are overlaid, adding detail and sharpness to the texture. Followed by caviti generated from the same normal maps and last nakladyvaemymi of okrugin sharp level and hips in a very small value.

— Block colored onluine
As pbr Shader does not accept a baked light, then you can convert it to color variability. But, this is my experiment. I made this functionality in a separate block, where the branches blew the opportunity to tint okrugin in each major
the Result of coloring okrugina by masks.
Unit of the second overlay pattern
In this unit, I can overlay the second pattern on top of the existing pattern of the fabric. With the ability to remove the lower pattern
mask. This part also includes several lines corresponding to the names of the materials used in the main block and
the ability to change the color of the overlay pattern.

— alpha in 16 bit
Not important enough that the original color of the mask, which must be 16 bit, in order to avoid hard changes midadult different layers, and therefore the patterns that are cropped by the mask. Later it may affect nnormal Marie in the form of seams and color variations.
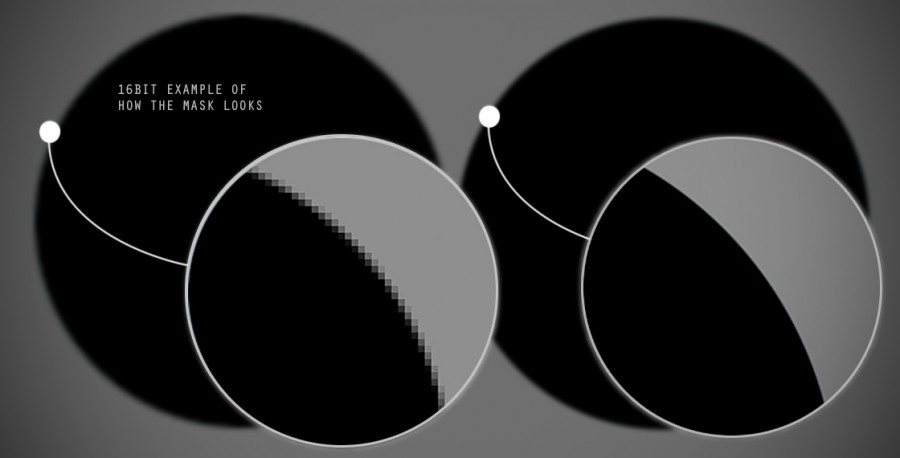
Example of how to look like the edge of a 16-bit mask 8-bit.
— Work with grace textures
If the texture loaded in a Substance without colour, and further manipulation with this texture will also be in b/W tones, tagilatelle to choose grace mode. This will significantly increase the speed of processing schemes in allegorica. In my case node in RGBрежиме were processed at a speed of 40 milliseconds, after conversion, in the grace processing speed fell to 12 milliseconds.
There is one little thing that can increase the speed of processing schemes disabling alpha blending in the blend node, tomslake when soft mix don't mean it.Be sure to sign for himself, the node that the schema is expanded, without proper names I get confused very quickly.- Creating a pattern in photoshopС patterns, I was not a great experiment, I photographed t-shirt in macro mode. I need a pattern I tried to repeat in 2 ways. In the first it was required to describe the smallest part of Paterna and recapitulate it. In the second, cut with pictures, and repeat for the required permission, hiding the Clone stamp tool, all inconsistencies. The best method was to describe in photos the smallest part of the pattern and repeat it through the function layer is Pattern overlay.
— Create pattern in photoshop
With patterns, I was not a great experiment, I photographed t-shirt in macro mode. I need a pattern I tried to repeat in 2 ways. In the first it was required to describe the smallest part of Paterna and recapitulate it. Second, cut out the pictures and repeat for the required permission, hiding the Clone stamp tool, all inconsistencies. The best method was to describe in photos the smallest part of the pattern and repeat it through the function layer is Pattern overlay.
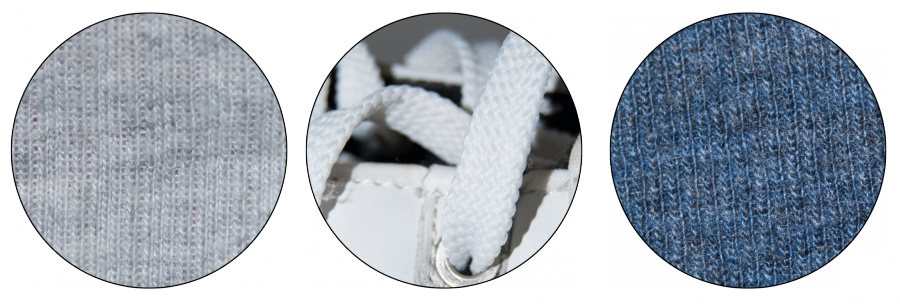
Original photo high quality.
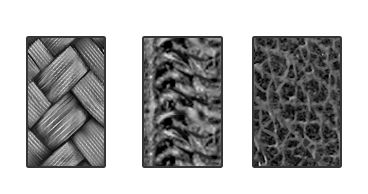
The diversity pattern depends on the scale of repeated parts, the bigger it is the more breaks and heterogeneities can be added to the pattern. For example, if you take the element 64 x 64, the maximum that can fit in this scale is the smallest part of no difference of colours and any differences between the elements. But after I repeated the pattern on a new layer using the layer effect Pattern overlay, pre-marking in the tab Edit Define pattern that the image file patern and applied it to the file with a size of 128 pixels, then I could add more variety, some elements to make it brighter or darker. So I will add that in this case the smallest element is I'm starting to paint in 16 bit mode, it gives a quality stock, especially when photographing in .raw format initially I get 16-bit quality.
Paterna Prepared for rendering.
The following is an example of the assignment of the element in the pattern through the layer settings. For patterns I used the finished size of the texture, and already prepared textures load in counter-strike. This is because a node pattern that can replace the operation shown below, degrades the quality of the pattern. For me the decision was the best. The assignment of an element to the pattern.

the purpose of the element pattern.
Overlay color by caviti
During work on the texture of the body, I experimented, since the albedo is not required any baked lights in the texture, I decided the shade that I got laying on top of the texture red and green channel from the normal maps using overlaid or light tint and use them as additional shade. Attached to each layer select a colour and adjust hue that will be multiplied with the base polypaint. In the end it turned out not bad, although not properly based on pipline work with the PBR Shader.

colored by caviti.

Layers by caviti with the ability to change their color.
In the end I got a working scheme which is able to rebuild by id mask texture which do not differ in materials and styles, but because of the volume of transactions and the resolution of all textures scheme emerged gramotki, and the collection of each new texture goes from hour to hour.
Note
After downloading Rognes texture in Marmoset, you should not forget to put a tick Invert, as the model with this texture
a little different from Substance designer.
— description of the settings of the skin and corset
Here I have little to write, as all the setting material was produced in allegoric and marmoset display materials completely such as they were alegorica, except that I had to insertnote Rognes texture and green channel in the normal map.
Most it configure Rognes or spekulâr on the women's Breasts, they always look particularly interesting.

Textures
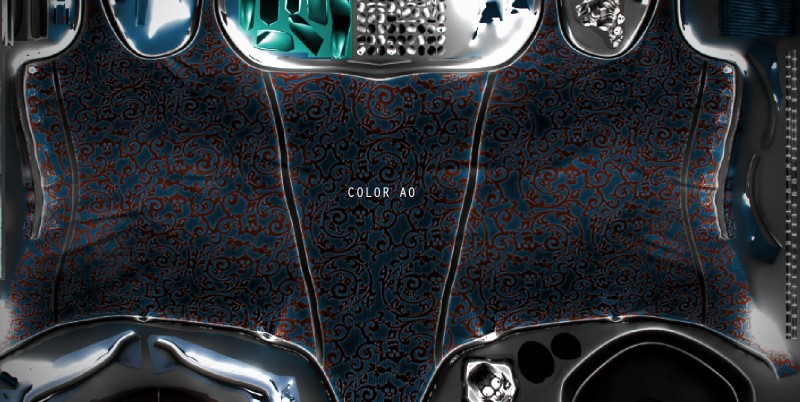
The result of the block diagram can be seen in the texture below. You can see how the color of okrugin gives uniformity Tsvetana leather veins, and as a clearly readable pattern tissue to normal'.
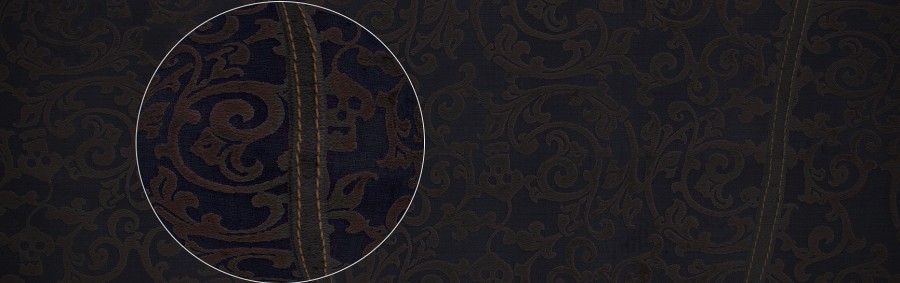

Texture made of the above described block diagram.
— rigging in modo and painting wedge map in may
Skinning character I performed partially in modo partly in may, assign bones and bind to the body was done in modo. For the manufacture of bone tools in the Skeleton Setup tab, for the connection of bones with the body will need to highlight the layer with the object and the bones themselves, then, the function Blend with the setting of visible Smooth bind the bones to the object with an approximate veydzh mapoi. All this procedure should be performed after you switch the Setup mode on the viewport, therefore viewport receives a yellow frame.
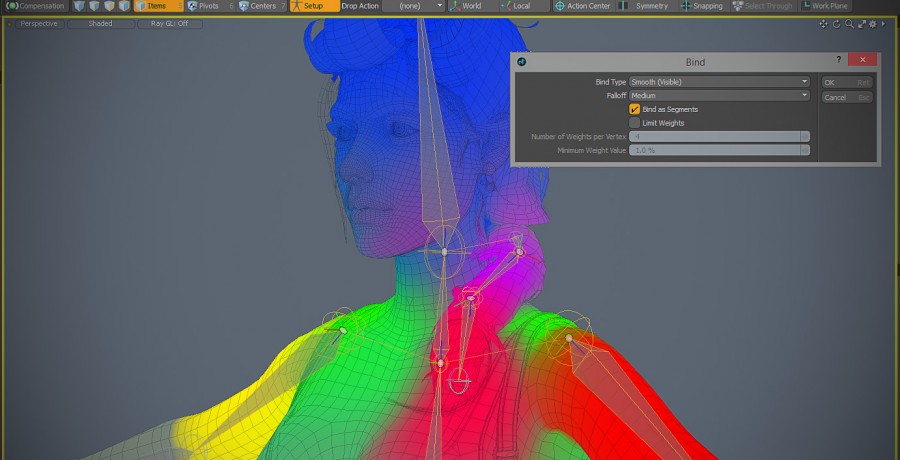
All other manipulations and drawing a pose I did in maya, and then required to draw and tweak the weight on the body. In maya there is a function brush that I've fixed all of Potentate on the model.
And so as the mesh density did not allow to work comfortably, I made a simplified model of low poly to be exact, only used a simplified naked body without details and all the clothes. In this case, it is required to bind bones to a new model. To do this, in maya you want to go to the Rigging tab menu Skin, choose Bind skin pre-selected bones and body, and from the menu choose Geodesic voxel, in front line of the Bind method. The whole point of the operation is that would be to copy Skin Weights from a simplified model of my final lowpoly. That will significantly speed up the process of painting weights.
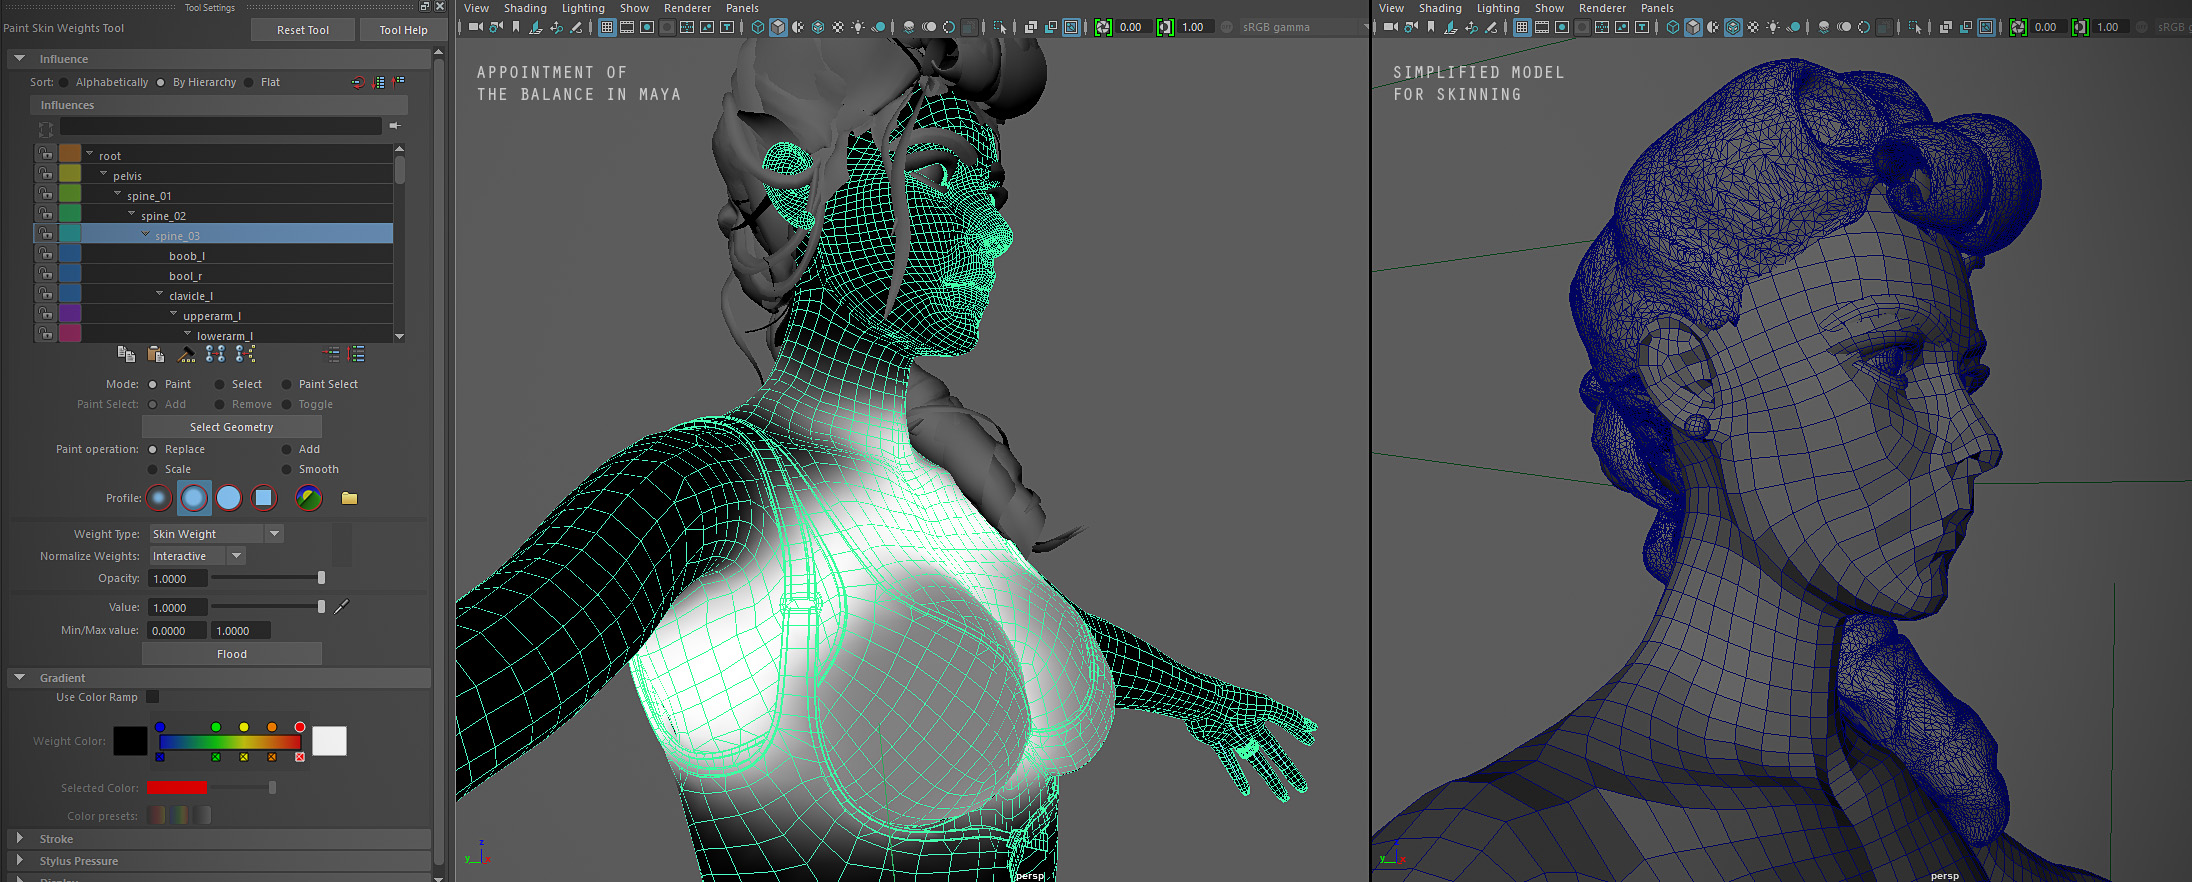
Painting weights in maya final model and a simplified topology to obtain the weights.
If you want to copy Skin Weights map, you need to first choose the final object, then the object you want kopilovtsi Weights and select the Skin Copy Skin Weights.

binding a skeleton to the body and copy weights from one model to another.
For
I learned that the record of any minor knowledge for themselves not just strengthens the memory of them, but later allows
to perform recorded, after re-reading. Analysis of something, it is a weapon of the weak against the strong. If you have a bad
memory and you lose focus, then my advice is do not part with Notepad.
Features
computer
intel core i7 2.40/2.40
Ram 16 GB
nvidia geforce gt 650M
My contacts and portfolio.
www.behance.net/IsadistI
www.facebook.com/yriy.romanyk
vk.com/id2351912
instagram.com/romanyuk_yuri


Комментарии
Отправить комментарий