The use of system APIs in Sailfish OS
Introduction
Voice assistants on mobile devices are not static and are continuously evolving. Voice assistant for Sailfish OS, presented last fall, is no exception and also acquires new functionality.
In that article, focusing on the basic principle of the internal operation of the application. This material offers a series of two articles in which it will be discussed in detail:
-
the
- Working with undocumented APIs for device management (current); the
- Working with interfaces D-Bus, provided by the operating system.
In the current article describes how to control the screen brightness and system volume, and how to enable or disable Bluetooth and flight mode.
Assumes that the reader already set Sailfish OS SDK and developed applications using it.
the
to obtain information
While developing for Sailfish OS you can not do without the documentation provided on official website and in the IDE. Documentation is written efficiently, with examples, but not without fault — it is short and covers only the basic functionality available to a programmer.
But Sailfish OS, like other operating systems, hides more described in the documentation. You just have to know where to look. And it is necessary to look in the source code as the most reliable source of information. Benefit of the Sailfish OS — an open software product based on GNU/Linux.
For starters, you need to connect to the phone via SSH (figure 1). For this we need to enable remote connection (1), password (2) and use one of the IP addresses (3). After done action to navigate to the directory
/usr/share. This directory contains interface codes and scripts almost all applications installed on the phone.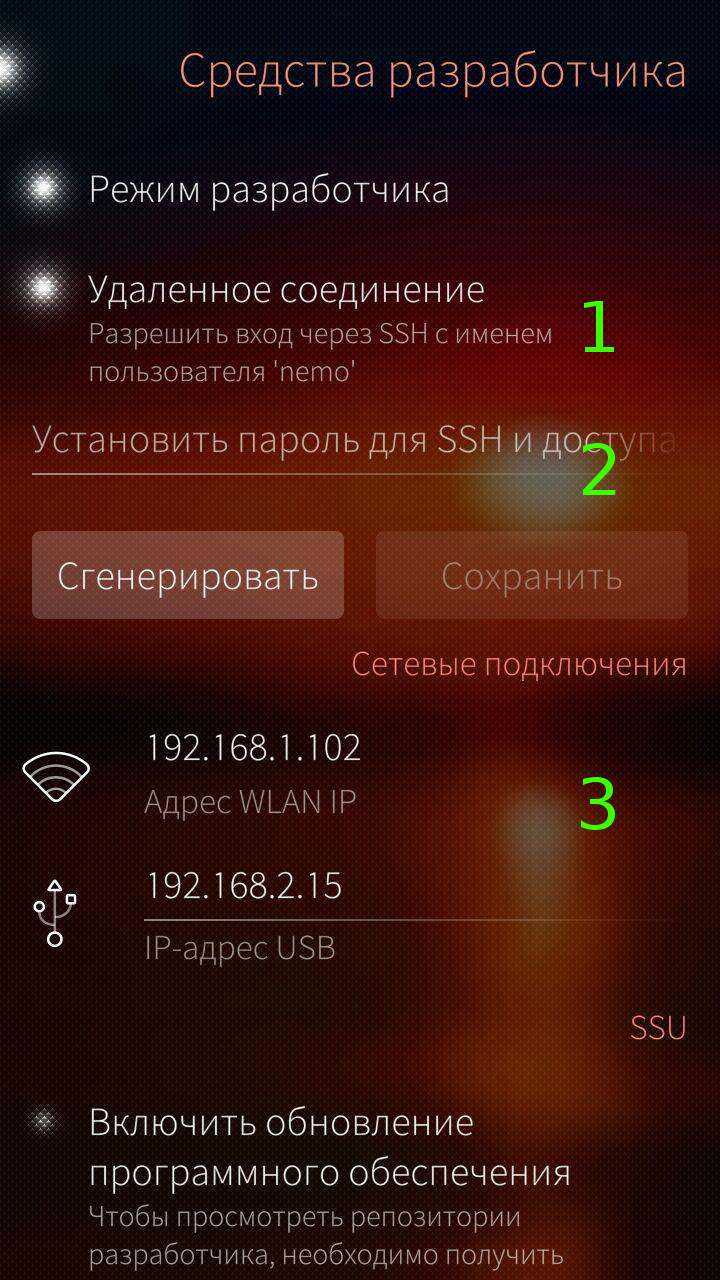
[Figure 1 — connection setup to the phone via SSH.]
Catalogs of third-party apps start (in most cases) with the prefix
harbour followed by the program ID. The prefix allows to prevent crossing of names to system names. Catalogs of standard applications are accompanied by prefixes jolla and sailfish. The rest refers to system functions.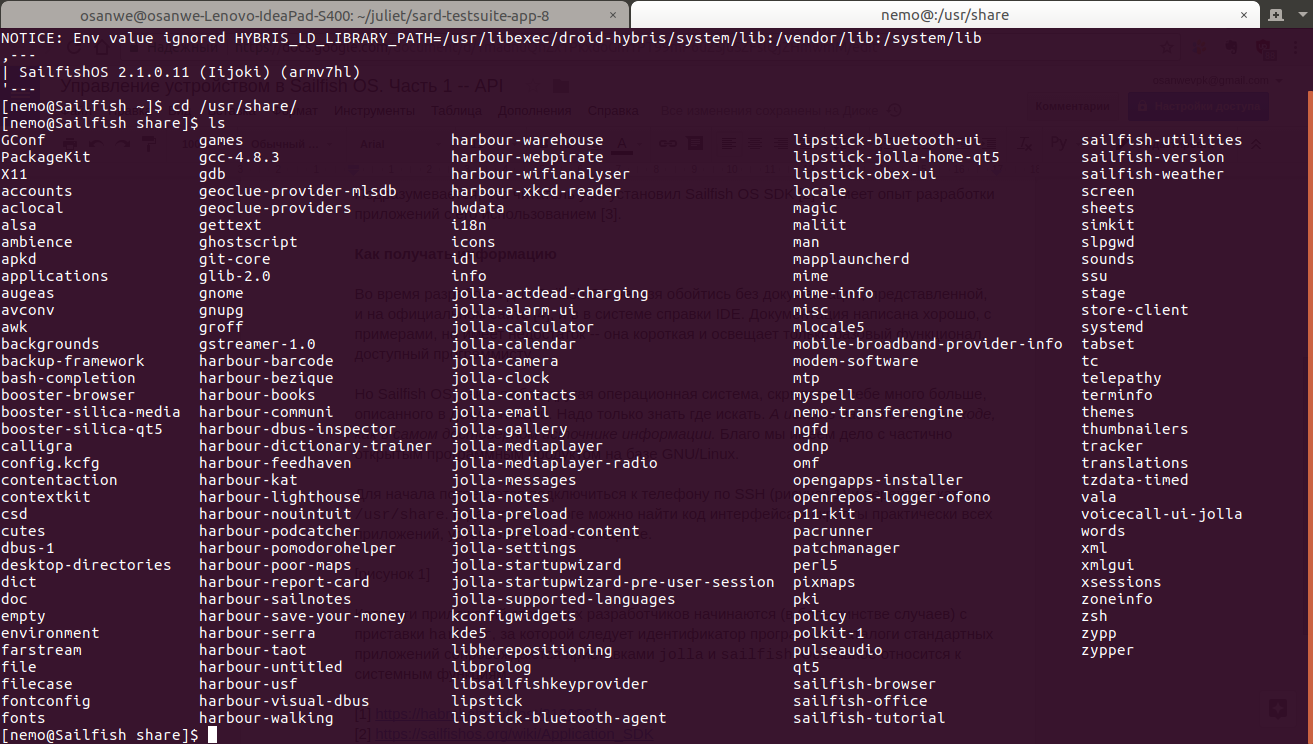
[Figure 2 — Example application directory.]
the
adjust screen brightness
Controls the brightness of the screen belongs to the user's system settings, hence the interest in the directory
/usr/share/jolla-settings, which contains the following objects:the
-
the
entries— stores information about the structure of preferences;
the - the
pages— stores page elements and settings;
the widgetsis generally not used;
the - File
settings.qml— the main startup file of the application settings;
the - File
x-openvpn.xml— stores information about the connection with the VPN server.
From the list it is seen that the marked task is required to access the directory
pages. It is divided into subdirectories according to the configuration types: bluetooth, sounds etc. the screen Settings are located in the directory display. Therefore /usr/share/jolla-settings/pages/display is the full path relative to which will be the follow-up work.The first step is to search for a keyword:
grep -H 'brightness' *
$ cd /usr/share/jolla-settings/pages/display

$ grep -H 'brightness' *

BrightnessSlider.qml: label: qsTrId("settings_display-la-brightness")

BrightnessSlider.qml: value: displaySettings.brightness

BrightnessSlider.qml: onValueChanged: displaySettings.brightness = Math.round(value)

BrightnessSlider.qml: onBrightnessChanged: slider.value = brightness


display.qml: entryPath: "system_settings/look_and_feel/display/brightness_slider"

display.qml: text: qsTrId("settings_display-la-adaptive_brightness")
The results show that the code set the brightness of the screen is in the file
BrightnessSlider.qml.Next, we need to clarify how exactly you manage:
grep -C 1 'displaySettings' ./BrightnessSlider.qml
$ grep -C 1 'displaySettings' ./BrightnessSlider.qml

label: qsTrId("settings_display-la-brightness")

maximumValue: displaySettings.maximumBrightness

minimumValue: 1

value: displaySettings.brightness

stepSize: 1


onValueChanged: displaySettings.brightness = Math.round(value)


DisplaySettings {

id: displaySettings

onBrightnessChanged: slider.value = brightness
After a search on the file it becomes obvious that to control the brightness of the device you want to create the object
DisplaySettings and change the value of the field brightness, taking into account that the minimum value of brightness equal to one and the maximum is stored in the maximumBrightness.The final touch is to determine the required imports:
grep 'import' ./BrightnessSlider.qml
$ grep 'import' ./BrightnessSlider.qml

import QtQuick 2.0

import Sailfish.Silica 1.0

import com.jolla.settings.system 1.0

import org.nemomobile.systemsettings 1.0
QtQuick and Sailfish.Silica are standard modules for interface development and do not provide access to settings. com.jolla.settings.system contains the internal objects for the application settings and not of interest to other programs. Remains org.nemomobile.systemsettings, opisyvaemye required component.Thus, it becomes possible to form a control screen brightness for subsequent inclusion in the project:
BrightnessControl.qml
import QtQuick 2.0
import org.nemomobile.systemsettings 1.0

Item {
id: brightnessControl

/* Set the brightness to the specified value.
* @param: value-the number from 1 (minimum) to maximumBrightness (maximum)
*/
function setBrightness(value) {
if (value <= 1) setMinimumBrightness();
else if (value >= displaySettings.maximumBrightness) setMaximumBrightness();
else displaySettings.brightness = value;
}

/* Increase brightness.
* @param: percents-percentage of the brightness range.
*/
increaseBrightness function(percents) {
setBrightness(displaySettings.brightness + _calcDelta(percents))
}

/* Decrease the brightness.
* @param: percents-percentage of the brightness range.
*/
decreaseBrightness function(percents) {
setBrightness(displaySettings.brightness - _calcDelta(percents))
}

/* Set minimum brightness.
*/
setMinimumBrightness function() {
displaySettings.brightness = 1
}

/* Set the maximum brightness.
*/
setMaximumBrightness function() {
displaySettings.brightness = displaySettings.maximumBrightness
}

/* Calculate absolute value of the change.
* @param: percents-percentage of the brightness range.
* @return Boolean change the brightness in absolute units.
*/
_calcDelta function(percents) {
return Math.round(displaySettings.maximumBrightness / 100 * percents)
}

DisplaySettings { id: displaySettings }
}
the
system volume
Here we use the already known method of finding information. Go to the directory
/usr/share/jolla-settings/pages/sounds and check the keywords:grep -i-C 1-H 'volume' *
$ cd /usr/share/jolla-settings/pages/sounds

$ grep -i-C 1-H 'volume' *

SoundsPage.qml-

SoundsPage.qml: VolumeSlider {

SoundsPage.qml: id: volumeSlider

SoundsPage.qml: property string entryPath: "system_settings/look_and_feel/sounds/ringer_volume"

SoundsPage.qml - width: parent.width

--

VolumeSlider.qml - height: implicitHeight + valueLabel.height + Theme.paddingSmall

VolumeSlider.qml: //% "Ringtone volume"

VolumeSlider.qml: label: qsTrId("settings_sounds_la_volume")

VolumeSlider.qml - maximumValue: 100

--

VolumeSlider.qml - if (!externalChange) {

VolumeSlider.qml: profileControl.ringerVolume = value

VolumeSlider.qml - profileControl.profile = (value > 0) ? "general" : "silent"

--

VolumeSlider.qml slider.externalChange = true

VolumeSlider.qml: slider.value = profileControl.ringerVolume

VolumeSlider.qml slider.externalChange = false

--

VolumeSlider.qml-

VolumeSlider.qml: onRingerVolumeChanged: {

VolumeSlider.qml slider.externalChange = true

VolumeSlider.qml: slider.value = profileControl.ringerVolume

VolumeSlider.qml slider.externalChange = false
From the result shows that maximum volume is 100, minimum is 0; and the control is performed using the
element profileControl, and requires not only specifying a value for the volume, but switch profile. Get more information about the mentioned item:if (!externalChange) {
profileControl.ringerVolume = value
profileControl.profile = (value > 0) ? "general" : "silent"
}
--
slider.externalChange = true
slider.value = profileControl.ringerVolume
slider.externalChange = false
--
ProfileControl {
id: profileControl
--
slider.externalChange = true
slider.value = profileControl.ringerVolume
slider.externalChange = false
$ grep 'import' ./VolumeSlider.qml
import QtQuick 2.0
import Sailfish.Silica 1.0
import com.jolla.settings.system 1.0
import org.nemomobile.systemsettings 1.0
On the basis of search results and information from the previous section, it becomes possible to implement a module to manage your system volume:
VolumeControl.qml
import QtQuick 2.0
import org.nemomobile.systemsettings 1.0

Item {
id: volumeControl

/* Set the volume to the specified value.
* @param: value-the number from 0 (low) to 100 (maximum).
*/
function setVolume(value) {
if (value <= 0) {
setMinimumVolume();
} else if (value >= 100) {
setMaximumVolume();
} else {
profileControl.ringerVolume = value;
_setProfile();
}
}

/* Increase the volume.
* @param: percents-percentage of the volume range.
*/
function increaseVolume(percents) {
setVolume(profileControl.ringerVolume + percents)
}

/* Decrease the volume.
* @param: percents-percentage of the volume range.
*/
function decreaseVolume(percents) {
setVolume(profileControl.ringerVolume - percents)
}

/* Set the minimum volume.
*/
setMinimumVolume function() {
profileControl.ringerVolume = 0;
_setProfile();
}

/* Set maximum volume.
*/
function setMaximumVolume() {
profileControl.ringerVolume = 100;
_setProfile();
}

/* Set profile relative to the set value of the volume.
*/
_setProfile function() {
profileControl.profile = (profileControl.ringerVolume > 0) ? "general" : "silent"
}

ProfileControl { id: profileControl }
}
Here we should pay attention to using the keywords
general and silent to control the sound profile of the system (main and silent, respectively). That's two reserved values that determine the behavior of the system depending on the set value of the volume.the
Toggling airplane mode and Bluetooth
The principle of the search API is absolutely identical to the one described above, therefore, proceed directly to the consideration of ready-made elements.
To control the flight mode you want to connect the module
MeeGo.Connman providing component NetworkManagerFactory. Exposing the value of the field instance.offlineMode of this object to true or false, it is possible to enable and disable the mode, respectively.FlightControl.qml
import QtQuick 2.0
import MeeGo.Connman 0.2

Item {
id: flightControl

/* Inclusion of the “In plane”.
*/
turnOnFlightMode function() {
connMgr.instance.offlineMode = true
}

/* Turn off the “In plane”.
*/
turnOffFlightMode function() {
connMgr.instance.offlineMode = false
}

/* Switching mode with the airplane.
*/
switchFlightMode function() {
connMgr.instance.offlineMode = !connMgr.instance.offlineMode
}

NetworkManagerFactory { id: connMgr }
}
To control the state of Bluetooth module also connects the
MeeGo.Connman but using the TechnologyModel, the value of the field powered which takes true or false to enable or disable the Bluetooth, respectively. It is worth noting that the rest of the user interface is made using the standard features in Qt.BluetoothControl.qml
import QtQuick 2.0
import MeeGo.Connman 0.2

Item {
id: bluetoothControl

/* Enable bluetooth.
*/
turnOnBluetooth function() {
btTechModel.powered = true
}

/* Turn off bluetooth.
*/
turnOffBluetooth function() {
btTechModel.powered = false
}

/* Toggle bluetooth.
*/
switchBluetooth function() {
btTechModel.powered = !btTechModel.powered
}

TechnologyModel {
id: btTechModel
name: "bluetooth"
}
}
the
Conclusion
This article shows one way of finding undocumented features in Sailfish OS and presents sample code to control brightness, volume, Bluetooth and airplane mode. Learn more about the implementation of these and other control modules to the system preferences (as well as to methods of their application) on GitHub.
However, before looking at finished code, try to implement and enable any module, and then compare with the published example. You can for example try to change the design (search for
fontSize), manage Wi-Fi (wifi) or General Internet access (tethering).The next article will be dedicated to what interfaces and functions D-Bus provides Sailfish OS to the programmer.
Arising in the course of development of ideas and questions you can discuss at Telegram chat and Facebook page.
Thank abrowser ragequit for invite, which gave the opportunity to publish this and subsequent articles.


Комментарии
Отправить комментарий